Thursday, May 8, 2014

Book Report: What I've Been Reading


One of my New Year's resolutions is to read more books. It feels weird to type that, because I've been a bookworm since I learned to read -- frankly, I'm obsessed with books. Oddly enough, though, I found myself reading less and less over the past few years. I got so busy with all my responsibilities as a mom that I put my favorite pastime on the backburner. Not anymore! This year, I've made my personal reading a priority again and, well, let's just say I wish all resolutions were this enjoyable to keep!

I thought I'd share a few of my recent reads with you -- at least the ones that are applicable to this blog. (If you're curious of all the other books I've been reading/listening to, you can check out my Goodreads profile here.)  

{Pssst! Let me just say from the get-go, any of these books would make a wonderful Mother's Day gift. If you order today with Amazon 2-day Prime shipping, you'll most likely get it in time! Or you could be all old-school and go to an actual bookstore...}

Weelicious: 140 Fast, Fresh, and Easy Recipes by Catherine McCord
One thing I am adamant about in my kitchen is that I will only cook one meal at dinnertime; I'm no short-order cook. The kids eat what the adults eat (and vice versa).  As I was looking for some more kid-friendly recipes, I  was drawn to the premise of this cookbook: one family, one meal.  I was curious how she could make food that wasn't too intense for kids but not too bland for parents. This book has lots of simple recipes and my family has enjoyed almost everything I've made from it. Particular favorites: the graham crackers (I actually prefer her recipe over the one I've been using from The Homemade Pantry), enchiladas, pumpkin waffles, pesto meatballs, cottage cheese pancakes, and wonton soup. This cookbook is definitely a great resource for family-friendly recipes and ideas. 

I did a have a couple drawbacks about the book: one, the book is full of photos of the author in such posed situations (she mentions in the book how she used to be a model and it shows); I would rather see more photos of food than of her working in her garden, looking over her shoulder at the camera, or gnawing on a chicken kabob. Another drawback: I came to this book for some help with a picky toddler and I found all the talk about how absolutely amazing her kids are and how they eat every single thing ever offered them kind of annoying/frustrating.  But, I have to give credit where it's due -- that picky toddler has eaten pretty much everything I've made from the book!  


Nom Nom Paleo: Food for Humans by Michelle Tam and Henry Fong
Last year, my doctor advised me to limit grains and dairy in my diet. When he told me that, I immediately thought of my dad, who has followed a paleolithic diet for years (right before it started getting all popular) and decided to turn to some of the paleo cookbooks for ideas of what to eat. I'd flip through various paleo cookbooks, thinking some of the recipes looked good, but they mostly made me miss all the foods I really wanted to make. (Spaghetti squash can never replace regular spaghetti for me, no matter how hard I try). 

Anyway, I found Nom Nom Paleo a few weeks ago and was blown away because every recipe in the book looks delicious! Seriously, I would make any of them. Unlike other paleo cookbooks I've come across, the writing style is fun to read, not preachy, not dogmatic, no doom-and-gloom talk of how wheat will kill us all. I'm still working on cooking through this cookbook, but I'll tell you, what I have made has been awesome. One stand-out: the walnut shrimp. It was just as good as the kind I order at my favorite Asian restaurant. I couldn't believe it was paleo! My husband took the leftover spiced maple walnuts from the recipe to work and his coworkers loved them. My family doesn't follow a strictly paleo lifestyle, but this book definitely has a place on my kitchen bookshelf (yep, I have one -- cookbooks are my weakness) because I want to feed my family whole, unprocessed foods. I can't recommend this cookbook enough!

The Edible Garden: How to Have Your Garden and Eat It, Too by Alys Fowler
I can't quite remember where I saw vegetables incorporated into flowerbeds for the first time. I can remember, though, how the purple cabbages were woven in with the flowers and how brilliant I thought it was. Over the years since then, I've become enamored with the idea of turning yards and lawns into mini-homesteads. So when I saw this book, I ordered it right away. My impulse buy did not disappoint at all.

Simply put, I loved this book. So often, gardening books get complicated and/or formulaic; this book is neither of those things. Alys Fowler's approach feels so natural and the way she writes is so friendly, like she's walking you through her garden and giving you information, recipes, and tips as you go. Like the tip about making fertilizer out of comfrey -- I'm still excited about that one and trying to get some Russian comfrey into my garden as soon as possible.  One other kind of silly thing I loved: this book is so British! The Anglophile in me couldn't help but sigh over phrases about how rhubarb is "a doddle to grow" or the best ways to grow courgettes and aubergines (zucchini and eggplants). This book was a lot of fun to read and it made me even more excited to get out in my garden and try new things!

Smart Money Smart Kids: Raising the Next Generation to Win with Money by Dave Ramsey and Rachel Cruze
If you've read this blog for a while, you probably know that I am a Dave Ramsey devotee. I wholeheartedly believe that his program of seven "Baby Steps" leads to financial peace. My husband and I have completed Baby Steps #1 and #2 and we're close to finishing #3. If you haven't read The Total Money Makeover, stop reading this post now and get your hands on a copy! 

Since, as I said, I am a big fan of Dave Ramsey, I preordered my copy of his latest book, Smart Money Smart Kids. I went into this book already familiar with his program for kids, but I still learned a lot. I could write a whole post about Dave's program for kids and teenagers, so I will soon. But for now, I'll just say that this book should be required reading for every parent. What a world it would be if the next generation followed the principles in this book!

The Nesting Place: It Doesn't Have to Be Perfect to Be Beautiful by Myquillyn Smith
This book surprised me, to be totally honest. I'd read lots glowing reviews of it, so I ordered a copy. At first, I only liked it and found myself sort of wondering what all the fuss was about. I found myself wishing it had more actual decorating ideas/how-to instructions -- the perfectionist in me likes having things spelled out and I struggle with improvisation and experimentation (which is a big theme of this book). But as I continued reading, I caught the vision of what this book is really about: transforming the place where you live into a home you love. I finished the book this past Monday and already I find myself feeling less intimidated and more excited about decorating my house. In fact, the day after I read it, I finally took down the curtains I've hated for years but have been too afraid and overwhelmed to change. Right now, I'm looking at the new drapes in my family room as I'm typing this and can't help but feel a surge of happiness. I love that room more now than I have in a long time!

In terms of how this book relates to this blog, Myquillyn Smith's message about contentment, gratitude, and finding joy in your present situation goes hand-in-hand with frugality. I know I've found myself thinking more about what I wish I had and about plans for someday, instead of living in the present. She also shares lots of tips of how to decorate inexpensively, often using things you already have and breathing new life into them. The writing is funny and moving all at once (I was in tears by the end). I wish I could buy a copy for each of the women in my life!

Note: Some of the links in the post above are "affiliate links." This means if you click on the link and purchase the item, I will receive an affiliate commission. Regardless, I only recommend products or services I use personally and believe will add value to my readers. 

Friday, May 2, 2014

Lovely Links: Lovely Locks Edition

About six months ago, I chopped close to fifteen inches off my hair.

Since I don't dye my hair and because I'd worn it up so much (being a mom with nearly waist-length hair meant lots of braids, buns, and ponytails), my hair was healthy enough to be donated. I even got a $10 discount for donating (everyone wins!).  I've always had long hair, but I was ready for the change and barely flinched when she chopped that long braid off. 

As the lady was styling my new haircut (which I loved), she was suggesting all sorts of products and tools I would need to style my now shoulder-length hair. Like I said, before the cut, I wore my hair up most the time; I didn't have time to blow-dry or curl all that hair! But once it was chopped off, I was told that I needed a flat iron, curling wand, salt spray, heat protectant, and mousse.

Confession: I was so excited about my stylish new hairdo, I bought all of it.

Granted, I didn't buy the $100 flat-iron the stylist told me I needed and the salt spray was basically free with the discount for I got for donating.  Still, I spent a good bit of cash buying these supplies. I felt a little strange buying all those beauty products. I mean, I'm the girl who has washed her hair with baking soda, cleaned her face with oil, and is using the same solitary eye-shadow compact I bought at least two years ago. 

Since I'm a little paranoid about frying my hair, I go easy with my styling tools, limiting myself to only 2-3 times a week. In the process, I've found a lot of alternate ways to curl my hair. In many ways, I find myself preferring the look of the heat-less curls over the heat-styled ones.

But why am I blogging about my hair on a blog about frugality? Because as I've been thinking about it, curling your hair without heat can actually save some money.

One way that heat-free curling can save you money is that undamaged hair means less trips to the salon. Split ends are often the result of heat damage and the only way to get rid of them, despite what many shampoo commercials say, is to cut them off. Unless you're particularly brave and can cut your own hair or you have a stylist in the family, you'll have to pay to get your damaged hair trimmed. There are lots of in-salon treatments for damaged hair, but the prices for them can range anywhere from $40 to $600 (seriously -- I did a little reading and there are these keratin treatments that can cost that much!). Even if you skip the professionals and try to fix heat-damaged hair at home, it can still get costly. 

Another way heat-less curling can save you money is pretty obvious: you don't need to buy an arsenal of tools and hair products, like curling irons, wands, flat-irons, or heat protectant sprays. For most of the heat-less curling methods out there, your needed supplies are likely things you already have at home and if you don't have them, they don't cost much. Usually, you just need a couple socks, some bobby pins, or a headband to curl your hair.

Here are a few of the many ways you can curl your hair without heat, often while you're sleeping:

This was one of the very first tutorials I pinned on my hairstyle board on Pinterest and one of the first I actually tried out. When I had all my hair wrapped up, it looked like some kind of weird hairstyle Princess Leia would have, but I went to sleep on it and hoped for the best. It totally worked! I got lots of compliments on it the next day, so, of course, I explained how to do it to a bunch of people. My friend has a darling little girl with super-fine, super blonde hair and she tells me this method is the only way her daughter's hair will hold a curl. My sister-in-law, Katherine, also swears by it and always has great results. I love this curling method for vacations -- it's so easy to just pack a headband! (The link at the top is where I first saw the idea and she has a video there (but it's kind of long). This pin has a quick and simple overview of how to do it; I would've put a link to that but I couldn't find the original source.)

Natural Waves :: Join the Mood
I like this tutorial because it doesn't have to set overnight to work. Plus, sometimes I'd rather have some soft, natural waves instead of curls. This method only requires some water and bobby pins.

Foam Curls :: The Shine Project
Of course, no post about heat-free curling would be complete without mentioning foam curlers. If you're like me, you have childhood memories of wearing pink foam curlers to bed at night (ouch) and waking up with Shirley Temple-esque curls. Even though foam curlers haven't changed at all since I wore them in the 1980s, there are ways you can use them stylishly in the 21st century. The link above is proof. 

{source}
Beach-hair waves are in right now and the whole goal is to look all windswept like you've been to the beach. I find it funny that often a lot of work is required to curl and style your hair so it looks like you didn't do it. In any case, this tutorial looks pretty simple and I'm totally going to give it a try.

71 Toes
This curling method looks really, really easy and only requires 3-4 socks to do it.  I hope my hair is long enough to make it work because I really want to try it this weekend. I love doing my hair Saturday night instead of when I'm trying to get my boys ready for church on Sunday.

Refinery 29
Empty coke cans, pink foam rollers, hand-ripped rags -- this post shows you how to use all them (though not all once) to get gorgeous hair. Seriously, each hairdo is gorgeous. Who needs a blow dryer or curling iron anyway?

Hope your weekend (and your hair) is lovely this weekend! 

Note: I have not received any compensation for writing this post. I have no material connection to the brands, products, or services that I have disclosed.

Monday, April 14, 2014

11 Reasons You Should Consider Beekeeping


This month marks the two-year anniversary of my husband and I becoming full-fledged beekeepers. I love telling people that I keep bees - some react with fascination, others think I'm nuts. There's this notion that beekeeping is complicated, scary, and even dangerous. Really, beekeeping is none of those things.  In fact, I'm convinced that just about anyone who cares enough about bees can become a beekeeper.

Here are eleven reasons why you should consider beekeeping:

1. HONEY!
I'll just get this one of the way: one of the best reasons to keep bees is for the honey! This past fall, we got our first honey harvest (we didn't get enough our first year since we had such dry conditions in 2012). You know that difference between a store-bought tomato vs. a homegrown one? Same goes for honey. I've never tasted better honey in my life! I remember eating it the first time, honeycomb and all, and feeling such a sense of awe and gratitude for those bees. Sadly, we are on our last jar of the liquid gold. Our September honey extraction can't come soon enough! (You can read all about our honey extraction experience here.)


2.  Having beehives helps your garden grow....and your neighbor's garden, too. 
Having tens of thousands of honeybees living in your backyard means lots of pollinators for your garden. Our beehives are actually located in my parents' yard (since our city banned beehives up until last year) and I asked my my mom if she noticed a significant increase in her garden's production. She told me that of everything in her yard, her raspberry bushes have benefited the most -- she had more berries on them than in years past, thanks to the bees.  I'm practically begging my in-laws to let me and my husband put a couple hives in their yard since they have a bunch of fruit trees; I'm sure their yields would be even better if we could get more pollinators there! (Note to self: forward this post to hesitant father-in-law...)

3. Beekeeping is a great way to be self-sufficient.
Keeping bees is a wonderful way to be self-sufficient - honey is a great replacement for regular white sugar. There are some start-up costs that comes with beekeeping, but it's a worthwhile investment. If I remember correctly, we spent about $350 when got started -- that price included our two hives (with three deep boxes each), two beekeeping jackets and hats/veils, gloves, a hive tool, a smoker, and, of course, the bees (that price doesn't include the class I took, but that didn't cost much, either).  After a few honey harvests, the hives will pay for themselves. The only real expenses after the initial start-up costs are for mite treatments (all-natural) and any supplemental feeding that may be necessary. Another self-sufficiency facet:  in terms of food storage, you can't beat the shelf life of honey because it lasts forever. Archaeologists have found honey from the ancient Egyptians that can still be eaten today.

4. It takes very little effort and time to keep bees. 
Do you have a dog or cat? You spend more time taking care of that pet than you would a couple of beehives. Even in the peak summer months when my husband and I do regular inspections, we probably spend less than an hour a month taking care of them. Seriously. The less you bother the bees, the better. All they really need is a short-and-sweet inspection every 10 days or so. The only time-consuming part of beekeeping is the honey extraction, but that part also happens to be a lot of fun.

5. Honey is good for your health.
Honey has been used for centuries for health and medicinal uses. Honey contains flavonoids that have been shown to reduce the risk of some cancers and heart disease. Honey is anti-bacterial and anti-fungal because the bees add an enzyme that makes hydrogen peroxide in the honey. For this reason, honey is actually a great treatment for wounds. I love adding honey to hot water and lemon when I have a cold, cough, or sore throat. Honey is actually as effective, studies have shown, as cough syrup. Another health benefit of honey is with allergy symptoms. Although there are no conclusive studies, many scientists believe as you ingest the pollen spores in honey in small amounts at a time, your body gets used to them and your allergic response to them diminishes. (One other medical sidenote: Did you know that scientists have found that bee venom can kill HIV? How crazy/cool is that?!)

One caveat: to get many of the health and medicinal benefits, you need to use raw, unprocessed (and local, particularly in terms of helping with allergies) honey. Most of the honey at the grocery store won't cut it. That's where beekeeping comes in: you can't get honey that is more local and raw than the honey that comes from your backyard.


For the other six reasons to consider beekeeping, check out my post at The Green Phone Booth!

{This post is linked up to the Homestead Barn Hop, Simple Lives Thursday, From the Farm Blog Hopand Little House Friday DIY Linky.}

Wednesday, April 9, 2014

How My Garden Grows: My Not-So-Complicated Planning Process

Years ago, I took a gardening class about flowerbed design and soon found out that my method of flowerbed design was all wrong. What was my method? Impulsive buying of pretty plants at the local nursery. No rhyme or reason, just whatever caught my eye. While fun, that approach doesn't yield the best results; it creates more of a mish-mash of a flowerbed (albeit, a pretty mishmash). 

Same goes for vegetable gardening. Sure, you could head to the local garden center or Home Depot and pick up a bunch of vegetable starts, but you probably won't get the most success from your garden that way. A garden plan will help you make the most of the space you've got. 


Over a week ago I mentioned that I'd be sharing my garden planning process here. Let me say from the get-go: I'm not really the planning, super-organized type of girl. I've been known to keep a daily docket/to-do list from time to time, but I'll probably never be one of those people who has a household management binder. More power to those types, of course, but the all-or-nothing perfectionist in me gets overwhelmed simply at the idea of that much planning and organization. I hope you weren't expecting something complicated, mathematical, or super-scientific. I don't have any cute printables to help you plan your garden, either. That's not just not how I roll (though, for the record, I do love nice printable charts). 

This is the process I've used for the last few years works for me. No hard and fast rules here; just inspiration to help you figure out your own planning process.


The first step of my planning process often starts when there's still snow on the ground: research and reading.  In those months and weeks of winter, that time that toys with my emotions with warm days then snowy ones, dreaming about my garden does a lot to help my spirits. You can read about some of my favorite gardening books here (many of which are pictured above). My other favorite source for garden inspiration and information is Pinterest (you can find my gardening board here).

Next, I read and review my garden journal. 


Do you keep a garden journal? Because if you don't, you really ought to consider writing in one. I started keeping one back in 2012 and I love it. (For more detail on why and how I keep one, you can read my post about it here).  


It helps so much to be able to read the details of the previous year's garden because by spring, I have only vague memory of what I did. My journal lets me know exactly what I planted, when and where I planted it, how it worked, and my successes and failures. Reading and reviewing my journal helps me organize my thoughts and it helps me not repeat the mistakes I've made. 


My next step is seed inventory. This is when I go through my seed collection and see what I have leftover from last year (and the year before that, in some cases). This is where seed testing can be helpful and necessary (read here for how to test your seeds before planting them). I can't tell you how many times I've bought a packet of seeds even though I already had enough at home. When I did my inventory this year, I found three packets for the same kind of Swiss chard.


Once I know what seeds I do have, I make a list in my garden journal of what I want to grow and what I'll need to buy. I love flipping through seed catalogs to help me plan my garden. When I've purchased the seeds or retrieved them from my jumbled stash, I write down the exact variety each crop I'm planting that year.

I buy my seeds from my local nursery/feed store and through the mail. My favorite mail-order seed company is High Mowing Seeds. (And, no, they're not paying me or giving me seeds to say that.) Personally, I prefer to use organic, heirloom seeds in my garden. Heirloom vegetables are perfect for frugal gardeners because you can can use the seeds from the produce you grow and plant again. I was practically giddy last year when the tomato seeds I'd saved from my 2012 tomatoes sprouted and grew!


Once I know exactly what I want to grow, I have to figure out where I'm going to plant everything. I draw up my garden boxes in my journal, along with notes for each container and pallet I have, too.


One thing I am trying to keep in mind as I'm planning where I'm going to plant each vegetable is crop rotation. I made this little table in my journal last year and I found myself flipping back to it many times as I was figuring out my garden plan this past week. (You can find more in-depth info about crop rotation here. My chart in my journal doesn't include their 'rebuild' step. Oops.)


I assign each of the vegetable crops I want to grow to specific garden boxes and pots, depending what was grown there last year and what plants grow well (or don't grow well) together. I also take into account how much I want to grow (depending on how much my family eats of that particular vegetable, how much canning I want to do, etc) and how much space that will require  As I plant them, I'll make a note of the date when they were planted on my garden map. The plan pictured above is from last year; it's nice to see at glance the story of what happened last season so I can plan accordingly for this season. It also makes me mindful of my calendar, so I know when to plant those tender plants, especially.

Does having a garden plan ensure you'll have a perfect garden? Obviously not. Despite plenty of planning and effort, my garden last year was just 'meh'. But having a plan still made it less frustrating and keeping track of it all will help me not repeat some of the mistakes I made. And, of course, no garden works without...well...work. But that's what's nice about having a garden plan -- your work has purpose and direction, along with (hopefully!) some delicious results.

{This post is linked up to Simple Lives Thursday, Homestead Barn Hop, and Little House Friday DIY.}

Friday, March 28, 2014

Lovely Links: Garden Planning Edition


Spring is finally here and with that comes gardening again! I turned over my garden beds a few days ago and, man, it was nice getting my fingernails all dirty again.

I feel like I'm a little behind schedule in my garden, though, since I'm still in the planning stages. The only things growing in my garden right now are the Swiss chard that overwintered (yay!) and the 30+ heads of garlic I planted last fall (YAY!). Next week, I'll post about my garden planning process here, but I thought it would fun to give you some inspiration for your weekend.  Whether you're growing a windowsill herb garden, a few containers on a patio, a garden in a corner of your yard, or a full-fledged homestead, here are a few links I've come across to help you plan your best garden yet!

1 Really Great Reason to Grow Food this Year :: Gardening Jones
On the fence about even bothering with a garden this year? Planning to grow a garden but need a little more motivation to dive in? The one reason described in this post is motivation enough.

Organic Vegetable Gardening 101 :: My Humble Kitchen
Great, basic info with links to posts about ordering seeds, the different types of seeds, succession planting, and more -- though I prefer the milk-jug seed starting method to starting them indoors. I'm also in love with the vertical planter boxes in this post.

Our DIY Raised Garden Beds - Chris Loves Julia
$10 Cedar Raised Garden Beds - Ana White
I love my raised garden beds!  If you don't have them yet, here are a couple great tutorials for getting yours started -- or, if you're like me, to rebuild yours because the wood frames of your existing garden beds are rotting away.

The Living Jigsaw: Planning for Crop Rotation in Your Garden :: Designing Edible Gardens
I've known for a while that it's not a good idea to grow the same crops in the same spots every year, but until last spring, I had no idea that you should rotate what type of vegetables you grow in each area of your garden in a particular order. Now that I understand the concept, it actually makes planning my garden easier.  Leaves - Fruits - Roots - Rebuild -- this post explains it all.

How much you need to plant to feed your family :: New Life on a Homestead
This post has a list of how much you would need to grow to feed yourself and your family for a year.  It's interesting , but it's also a bit overwhelming. While I would LOVE to be that self-sufficient, I don't have enough room in my garden beds to grow all that. Instead of feeling overwhelmed and bummed, I look at this list as a good guide to how much to plan on growing in the space I do have.

Lawns into Gardens :: New York Times
Speaking of garden space, my latest fascination: turning lawns and front yards into gardens. I mean, my lawn gives me grief every year (dandelions everywhere and it won't stay green); why not grow food instead? My husband isn't on board with this idea and I guess my boys need some grass to play on, but a girl can still dream.

Front Yard Vegetable Garden :: The Art of Doing Stuff
Now, this is something I could do...

One last thing: as you're deciding what to grow, consider growing some of the bees' favorite fruits, veggies, herbs and flowers.

Hope your weekend is lovely!

Thursday, March 20, 2014

How to Make an Essential Oil Reed Diffuser

A couple fairly new developments, resulting from Christmas gifts I got a couple months ago:


One -- I'm kinda sorta falling in love with essential oils. I mean, I've dabbled in essential oils for the last couple years, but this past Christmas my mother-in-law gave us the Family Physican Kit from doTERRA and it's AMAZING. I've used every oil in that kit (except for oregano - I'm a little scared of that one.) and love them. Even my skeptical husband has become a bit of a believer. Balance (the oil pictured above) isn't in the kit but I love it (and I used it for the project I'm going to describe). Though I'm still an essential oil novice, I'm really impressed by how much punch these oils pack and the many, many ways they can be used.


Two -- For the first time in my life, I'm in possession of a bottle of vodka. My brother and his wife gave it to me for Christmas and everyone had a good a laugh about it when they gave it to me. Why? I'm a life-long Mormon and I've never so much as tasted a drop of the stuff, let alone owned a whole bottle. (It was a big deal for me when I bought my first can of beer at age 30 -- to kill snails, of course.) It's actually a really thoughtful gift because my brother remembered me mentioning that I wanted to try making my own vanilla extract and to do that you need vodka. Seeing as I don't frequent the liquor store and all, I've never gotten around to buying a bottle of it. So, for the last few months, I've had it up in my cupboard, next to all the jars of homemade jam and salsa.

So besides the fact that the essential oil and the vodka were Christmas gifts, what do they have in common? They're two of the things needed to make an essential oil reed diffuser.  

I first came in contact with reed diffusers about eight years ago when I was working at Pier 1 Imports. I mostly waddled around the place because I was pregnant with my oldest at the time and just working to fill some hours since I'd quit my full-time job at Barnes & Noble. Granted, the diffusers weren't always so pleasant with the pregnancy-induced superhuman sense of smell I had, but I thought they were cool. Instead of spraying chemicals into the air or using those scenty disks you plug into the wall, the scent of the oil emanated from these skinny sticks that you dipped in them. Who knew?

A few months ago, I noticed that my doctor's office had an essential oil diffuser that was pluged into the wall and I wanted one -- I loved the way it made the room smell! Turns out, the diffuser he had in his office costs over $100. I'd love to have one still and there are all sorts of benefits to diffusing essential oils into the air, but that's pretty expensive. Then I got to thinking about the reed diffusers from my days at Pier 1.

Of course I consulted Pinterest and found out you can make your own diffusers with essential oils. There are a bunch of different methods and ingredients people use. One big difference I found: some use alcohol and some use a carrier oil (like almond or safflower). I opted for the alcohol version because I happened to have some on hand and I like that if this diffuser gets spilled (or knocked over by a kid or cat), it won't leave a big oil stain behind.


After some reading and experimentation, I've found the recipe I like and I'm going to share it with you today!

To make your essential oil reed diffuser, you'll need:


  • a small glass jar or vase; the smaller the opening, the better
  • 1/4 cup water
  • 2-3 Tablespoons vodka
  • essential oil 
  • bamboo skewers (how many you use depends on how many fit in your jar)

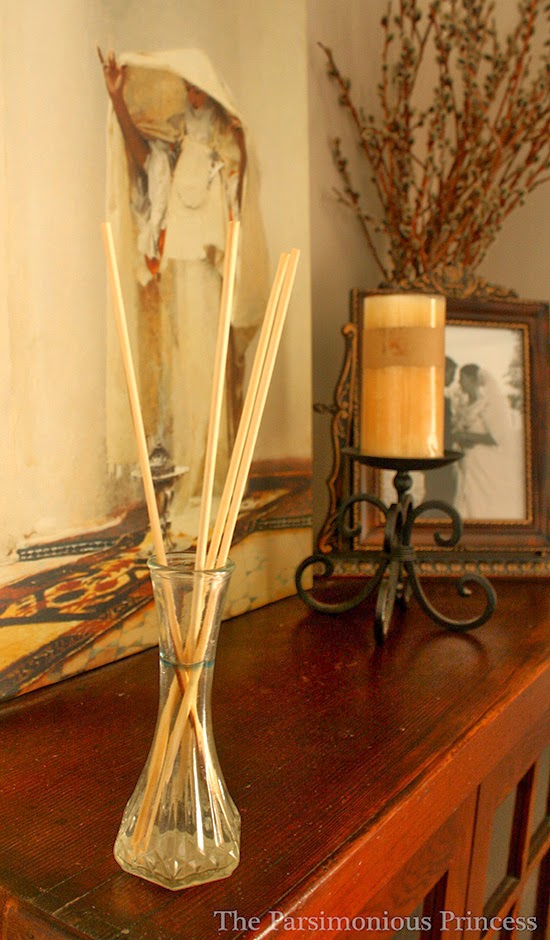
I scrounged around my house trying to find a container that would work well. It can be as fancy or plain as you like. I was planning on just reusing something from my collection of saved jars. I couldn't decide between a spice container from Ikea, a bottle from some yummy organic cream, and an old baby food jar (I don't know where that came from, to be honest), but then I remembered a little vase my mom gave me last summer. Though all the others would have worked all right, I liked the vase because it had the smallest opening; the smaller opening keeps the liquid from evaporating as fast.


Fill your jar/vase with the 1/4 cup water. 


Next, add the vodka. The purpose of the vodka is to help emulsify the water and essential oil. I started with two tablespoons but ended up adding a little more when I saw that the oils were still separating from the water.  (Photo credit: my seven-year-old actually used my DSLR and took this photo for me. I was pretty surprised that he got a clear picture!)


Add the essential oils. I started with 10 drops and then gradually added more until the scent was as a strong as I liked. 


Stick the bamboo skewers in the jar/vase and you're done. I read that some people think that you should opt for the actual reed sticks for your diffuser (and I think they're pretty inexpensive) because they work better, but the bamboo skewers work, too. It's what I had on hand so I went with them. So far, so good. Every few days or so, flip the diffusers to refresh the scent.

After I made mine, I was feeling pretty proud and I put it in a corner of my kitchen. Not the best idea -- the scent that is put out by this diffuser is subtle and seemed to be pretty easily overwhelmed by the various other aromas and smells that come out of the kitchen. So I moved it to my living room (it seemed like a good spot by that painting, in particular). I could smell it a little but not as much as I'd liked. I was totally bummed -- had my experiment totally failed?

Still not willing to accept defeat, I took it up to my room, thinking a smaller and more enclosed space would be better. Sure enough, that was the ticket. I put it on my dresser and gives off a nice, subtle smell. I'm sure if you used a bigger vase/jar, doubled the recipe, and used more skewers (or actual diffuser reeds), you could use this homemade diffuser in a bigger room. But to use what is pictured here, I suggest keeping it in a smaller, more enclosed room -- like a bedroom or bathroom.

Skip the chemical (and toxic) air-fresheners that don't really smell like anything anyway. Try out this simple air-freshener to give your home a pleasant and aromatic lift.

Note: Some of the links in the post above are "affiliate links." This means if you click on the link and purchase the item, I will receive an affiliate commission. Regardless, I only recommend products or services I use personally and believe will add value to my readers. 

{This post is linked up to The Homestead Barn Hop.}

Thursday, March 6, 2014

How I Get the Most Out of Our (smallish) Local Library

There are a few topics that once you get me talking about them, I pretty much can't shut up: Mary Poppins, natural childbirth (two babies sans epidurals, thankyouverymuch), the superiority of the A&E film version of Pride and Prejudice, beauty pageants (grrr!), and the flagrant use of pluralostrophes, just to name a few.

But, without a doubt, books are at the top of that list. Nothing gets me as excited, emotional, and passionate as the topic of books and the importance of reading. In fact, it's taking pretty much all the restraint I have to not go on and on about my love of reading: my bookwormy childhood and adolescence, my college experience as an English major, the time I spent as a Community Relations Manager at Barnes & Noble, how The Read-Aloud Handbook shaped a huge facet of how I parent, share my other all-time favorite books, refer you to my bibliophile Pinterest board, tell how I'm writing a novel....see, I'm doing it anyway. Stop, Heather, stop.


As you can imagine, I also have strong feelings about the importance of libraries as well. As Walter Cronkite said, "Whatever the cost of our libraries, the price is cheap compared to that of an ignorant nation." Libraries are absolutely essential

That said, my local library and I sort of parted ways for a while. Quite a while, actually. I could never find what I wanted. The selection seemed paltry. Granted, I live in smaller city, so I can't totally blame them. I didn't really even bother with the children's section because I'd had the same kind of luck there, too. So I fed my Amazon habit and bought a lot of books instead of borrowing them from the library. I used PaperbackSwap (an excellent resource) to curb my expenses, but I was still spending a lot of money on books. It wasn't my fault that I couldn't use the best money-saving resource for books there is -- it was the library's fault, right? Right? Riiiiight...

Then in 2012, when my oldest started kindergarten, I had an idea to listen to audiobooks with the kids in the car since we had a little bit of a drive to school (about 15 minutes each way). I knew the local library had an audiobook section for kids so I tried it out. Pretty soon, we started checking out some of the picture books in the section nearby and before I knew it, trips to the library were becoming a biweekly thing, if not a sometimes weekly trip, with us leaving with a stack of books. 

What I've learned is that I wasn't really approaching the library in very constructive way before. Sure, the selection wasn't great (for the record, it has gotten better), but I expected it to serve me, thinking I could just walk in, find exactly what I wanted easily, and leave. That doesn't always work with a smaller library like ours. It takes some advance planning, as well as use of all of the library's resources.

Here are five ways how I have finally made our local library work for us -- and save us money in the process:

1. Make a list.
There are so many great resources for finding reading suggestions! I love all the great lists you can find on Pinterest; Goodreads is also a great resource for book recommendations. I'm sure there are plenty other resources to find books that I haven't tapped into. I used to try to write them all down, but I found the best way for me to keep track of all the books I want to read and the books I want to get for my boys is through PaperBackSwap. Signing up for PaperBackSwap is totally free (you can read more about the program in a past post of mine here). I use the wish list and reminder list in my PaperBackSwap account to keep track of of the hundreds of books I want to read. (So many books, so little time...)

2. Check the library's website first.
When I've found a book that has piqued my interest, I head over to my local library's website to check their online catalog. If the book is in their catalog, I put it on the reminder list in my PaperBackSwap account; if it's not in the catalog, I put it on my account's wish list. This helps me know at a glance what my library has. If I think ahead enough, I'll check the library's website before we go to see if the books on my reminder list are available or if they're checked out.

3. Keep a list with you.
A lot of the time, my boys and I will just hit the library on a whim while we're out on an errand. Instead of trying to remember what I have on my reminder list, I just pull out the list I keep in my wallet. (Granted, I could log in to my PaperBackSwap account on my phone but the site doesn't really have a great mobile version -- at least last time I checked). I also keep a list in the bag I take to the library for our planned trips, just in case I'm in a hurry and don't have the time (or I'm too lazy) to check online. This list is just a bunch of titles that are on my reminder list, along with the last name of the authors.  I really like and often use this printable for a good pocket-size list, but your list doesn't have to be fancy. Take the picture above -- that pink pad of Post-It notes next to the stack of books is the list I've been keeping in my library bag. 

4. The library's waiting list is your friend.
I totally under-utilized the waiting list option back when I was frustrated with my local library. I would complain about the library not having what I wanted, but I never did anything about it besides leave empty-handed. Now, I'll get on the waiting list for books that I know I want to read, even when I'm in the middle of a bunch of others. It's always a fun surprise when I get an email from the library when I've made my way to the top of a waiting list. I do this with books for the kids, too; I'm off to pick a book for them up off the hold shelf today. 

5. OVERDRIVE!
I don't know how long my library has had OverDrive, but it's pretty new to me. And let me tell you -- I. Love. It. Basically, it's a way to download books from your library onto your computer, e-reader, iPod, and/or phone.  My first love will always be tangible books, but I'm trying to be flexible and open-minded when it comes to e-books.  Quite often, the library won't have the physical copies of some books I want, but they'll have the e-book version as an option.  The books are available for 1-2 weeks (depending on the limits set by your library) and when the time is up, they automatically return themselves. No need to worry about overdue fines or the library cop coming after you.  

I use OverDrive in two ways: 


I first learned about OverDrive when I read about it on this post about getting into audiobooks. Listening to books with my boys in the car had been so much fun, I wanted to do it just for myself. I followed this helpful tutorial to help me download audiobooks onto my iPhone via the OverDrive app. It's so easy! I love that I can take whatever audiobook I'm listening to with me everywhere. Unlike with CDs, I don't have to worry about losing my place or having a CD player. I just plug it into the adapter in my car or into my portable speaker.  I also love the feature that lets me speed it up -- lately I've been listening to the book pictured above at the 1.5x speed.


I resisted getting a Kindle for so long. However, once I realized how that there were a lot of books I could get via OverDrive, I was finally convinced and my husband got me a Paperwhite for my birthday. Like I said before, I definitely prefer holding a real book and turning real pages, but I'm digging this little Kindle. Today, I downloaded my first e-book via OverDrive and it was really pretty easy; I used this tutorial to help me do it.

I still have my book-buying Amazon habit and I still fully intend to keep buying the books I love for my home library, but I have saved quite a bit of money since the library and I got reacquainted. And I have to say, I didn't realize how much I'd missed that feeling of carrying an armload of borrowed books out of the library, because it is a pretty fantastic feeling.

Note: Some of the links in the post above are "affiliate links." This means if you click on the link and purchase the item, I will receive an affiliate commission. Regardless, I only recommend products or services I use personally and believe will add value to my readers. 

Monday, February 24, 2014

My 32 Favorite Parsimonious Posts on My 32nd Birthday

Today is my birthday! I've made a solemn vow to never be one of those women afraid to own her age, so I will unabashedly tell you that I'm turning 32 today.


And since I've been itching to getting back onto this blog (all of my writing time has been going into working on the second draft of my novel) and since I enjoy a good list, I thought I'd share my favorite posts from this blog -- not just the ones that are most popular, but the posts that I had the most fun writing, the experiments that made me feel validated, the high points of my frugal journey, and the tips/recipes that have been the most useful to me.

So, without further ado, here are my 32 (in no particular order):

1. Another 100 Painless Ways to Live Frugally - January 2013
I surprised myself with this post. I wasn't sure I'd be able to come with 100 more ways. I'm currently working on list #3.

2. Out to Dry: How I Stopped Using Dryer Sheets - July 2010
Definitely one of the tips I use the most. I haven't bought dryer sheets since 2010. Vinegar in the rinse cycle does the trick.

3. How We Start Most Mornings: Blueberry Spelt Pancakes - July 2012
I've been making these pancakes for years and the family loves them.

4. Our New (and Healthier) Waffle Recipe - April 2012
Another breakfast staple at our house. These waffles are delicious!

5. The Quilting Post: The Reveal, Plus 10 Reasons Why You Should Try - March 2011
I was so proud of myself for finishing that quilt, back when I was uncomfortably pregnant with my second child (who's going to be three next month -- crazy!).  I still tuck him in every night with that quilt.

6.  Homemade vs. Pre-Made: Classic Chocolate Chip Cookies - March 2011
This post makes me all sorts of sentimental. I did all of it when I was was two days overdue with the baby mentioned in #5. It reminds me of what it was like when it was just me and Max one-on-one and all the baking we did. One of the pictures has him in it and he looks so little. Yep, all sorts of sentimentality going on there. Oh, and I should mention that the recipe is really good, too.

7. Why and How I Keep a Garden Journal - August 2012


I am seriously missing my garden journal. I can't wait to get my hands dirty and then keep track of it all in here.

8. A New-Old Method: My Husband's Experience with Traditional Wet Shaving - June 2010
My husband is pretty patient with all my frugal endeavors and experiments, so I'm glad that this experiment worked out so well for him. His skin has improved so much since he tried this shaving method and he doesn't hate shaving anymore. One other reason I love this post: I loved getting comments from guys about it and seeing it being linked to traditional shaving forums; it just made me happy.

9. Sudsy Savings: Two Homemade Hand Soaps - March 2012
One of my most popular posts on here and for good reason: homemade hand soap is much cheaper than the store-bought stuff. I mostly stick to the foaming one but both recipes are great.

10.  Some Thoughts on Open-Mindedness and Frugality - January 2013
This was the post where I had to eat some humble pie. I like this post because it pretty much shows what my entire frugal journey has been like. I've learned to never say never. Plus, I loved this post because I got some really nice and insightful comments on that post.

11. Expecting Wonders: How to Test Your Seeds Before You Plant - March 2013
Anything that takes some of the uncertainty and waste out of gardening is always a plus.

12. The Easiest {and Best} Roast Chicken Recipe -  May 2011
I love this recipe. A lot. It's crazy-easy and so delicious.

13. How I Learned to Knit - January 2012
It was a long road, but I was so happy when I finally figured it out. I've been pretty lazy in terms of knitting lately, but I still love it so much.

14. Off the Needles: Max's Birthday Slippers - October 2012


Hands down, my favorite thing I've knitted.

15. Off the Needles: Wintry Weather Cowl - February 2012
Another knitted favorite. Still used regularly when it gets cold.

16. Gardening Without Soil: How to Grow Sprouts in Your Kitchen - February 2012
I felt pretty awesome when this worked out, even though it was so easy.

17. High and Dry: Why I Use a Clothesline - April 2010
Another reason I'm excited for spring: using my clothesline again. There are few smells I love more than clothes that have been dried outdoors.

18. My Favorite Part of Halloween: The Homemade Costume - October 2010
It really is my favorite part. Granted, it's the part that keeps me up at 2 AM, bleary-eyed in front of the sewing machine. But, oh how I love it. The planning, the trip to the fabric store, the sewing, and then seeing my family in their costumes. Warms my heart. I'm already planning this year's costume (think kaiju).

19.  Our New Chickens and Our Homemade Brooder - March 2012


I'd wanted chickens for years. I remember driving home with the three little chicks peeping in their box in the passenger seat and thinking, "I can't believe I did this."  But here we are almost exactly two years later with our little flock of the same birds (minus one that turned out to be a rooster) who are still supplying us with eggs.

20. The Chicken Tractor Kevin Built - April 2012
I'm married to a really awesome guy. Just saying. And I kept my part of the bargain and played a video game the whole way through.

21. How We Made Our Chickens' Water Poop-Free - June 2012
Chicken keeping game-changer. Seriously.

22. When the Moon Hits Your Eye: Easy & Delicious Homemade Pizza - December 2009
I love this recipe because it takes only 45 minutes from start to finish. Works great for my family's Friday night tradition of pizza and a movie.

23. Abbey's Award-Winning Chocolate Zucchini Cake - August 2012


If you only grow zucchini to make this cake, it will be time and garden space well-used. A-MAZ-ING.

24. Meatless Monday: Homemade Macaroni and Cheese - August 2011
Skip the neon-orange boxed stuff and make this. My boys gobble it up, even including the broccoli I add to it.

25. My Garden Highlight of 2013: Homegrown Garlic - October 2013
My garden wasn't so great last year, due in large part to some serious water restrictions and some snails and slugs. But the garlic! The garlic alone was consolation because it was so good! I'm down to one large clove of it and I can't bring myself to use it. Keeping my fingers crossed that the garlic I planted last fall will start sprouting in the next few weeks.

26. Canned Heat: How to Make an Emergency Heater - February 2011
This is, by far, the most popular post on my blog (100,000 views. Crazy!). It got featured on a bunch of websites, including Babble and Buzzfeed. I love having these heaters in my car in the wintertime -- they give me a lot of peace of mind.

27. More Good, Cultured Fun :: Making Frozen and Greek Yogurt - July 2013
The homemade frozen yogurt I made this past summer is, without a doubt, one of the most delicious things that has come out of my kitchen lately. Or ever.

28.  Sweet Success: Our Very First Honey Harvest - September 2013


Awesome, in every sense of the word. I've never loved thousands of little insects more than I did that day in September when we harvested 35 pounds of honey. How those honeybees make such a perfect product will never cease to amaze me. And word is from my parents, our honeybees are venturing out of and buzzing around their hives again!

29. My Fall 2012 Canning Recipe Roundup - October 2012
I love canning and 2012 was one of my best canning seasons yet, even though I felt, at times, like I lived in the kitchen. Totally worth it.

30.  Only in December: The Best Gingerbread Cookie Recipe - December 2010
I made at least five batches of these cookies this past December. This recipe went nuts on the Internet this past Christmas season, even getting featured on the Canadian edition of The Huffington Post, alongside the likes of Martha Stewart, Nigella Lawson, and The Food Network. I'm glad so many people loved them as much as my family does!

31. How Empty Milk Jugs Changed My Garden - July 2012
I wrote this post as a guest post on another blog called The Green Phone Booth and it was wildly popular (not to toot my own horn or anything but I think it's still the most popular post on their blog, according to their sidebar).  Milk jug mini-greenhouses are THE way to start seeds. The second I hear anyone mention that they're going to start their own seeds, I can't help but go on and on about this method as if it were gospel truth or something. One of the best discoveries I've ever made.

32. "We're Debt-Free!" : Of Car Payments and Baby Step #2 - January 2013
Definitely the best highlight since I started this blog back in 2009. I mean, that's one of the main reasons I do all this stuff, right?
Related Posts with Thumbnails