Showing posts with label Experiments. Show all posts

Thursday, March 20, 2014

How to Make an Essential Oil Reed Diffuser

A couple fairly new developments, resulting from Christmas gifts I got a couple months ago:


One -- I'm kinda sorta falling in love with essential oils. I mean, I've dabbled in essential oils for the last couple years, but this past Christmas my mother-in-law gave us the Family Physican Kit from doTERRA and it's AMAZING. I've used every oil in that kit (except for oregano - I'm a little scared of that one.) and love them. Even my skeptical husband has become a bit of a believer. Balance (the oil pictured above) isn't in the kit but I love it (and I used it for the project I'm going to describe). Though I'm still an essential oil novice, I'm really impressed by how much punch these oils pack and the many, many ways they can be used.


Two -- For the first time in my life, I'm in possession of a bottle of vodka. My brother and his wife gave it to me for Christmas and everyone had a good a laugh about it when they gave it to me. Why? I'm a life-long Mormon and I've never so much as tasted a drop of the stuff, let alone owned a whole bottle. (It was a big deal for me when I bought my first can of beer at age 30 -- to kill snails, of course.) It's actually a really thoughtful gift because my brother remembered me mentioning that I wanted to try making my own vanilla extract and to do that you need vodka. Seeing as I don't frequent the liquor store and all, I've never gotten around to buying a bottle of it. So, for the last few months, I've had it up in my cupboard, next to all the jars of homemade jam and salsa.

So besides the fact that the essential oil and the vodka were Christmas gifts, what do they have in common? They're two of the things needed to make an essential oil reed diffuser.  

I first came in contact with reed diffusers about eight years ago when I was working at Pier 1 Imports. I mostly waddled around the place because I was pregnant with my oldest at the time and just working to fill some hours since I'd quit my full-time job at Barnes & Noble. Granted, the diffusers weren't always so pleasant with the pregnancy-induced superhuman sense of smell I had, but I thought they were cool. Instead of spraying chemicals into the air or using those scenty disks you plug into the wall, the scent of the oil emanated from these skinny sticks that you dipped in them. Who knew?

A few months ago, I noticed that my doctor's office had an essential oil diffuser that was pluged into the wall and I wanted one -- I loved the way it made the room smell! Turns out, the diffuser he had in his office costs over $100. I'd love to have one still and there are all sorts of benefits to diffusing essential oils into the air, but that's pretty expensive. Then I got to thinking about the reed diffusers from my days at Pier 1.

Of course I consulted Pinterest and found out you can make your own diffusers with essential oils. There are a bunch of different methods and ingredients people use. One big difference I found: some use alcohol and some use a carrier oil (like almond or safflower). I opted for the alcohol version because I happened to have some on hand and I like that if this diffuser gets spilled (or knocked over by a kid or cat), it won't leave a big oil stain behind.


After some reading and experimentation, I've found the recipe I like and I'm going to share it with you today!

To make your essential oil reed diffuser, you'll need:


  • a small glass jar or vase; the smaller the opening, the better
  • 1/4 cup water
  • 2-3 Tablespoons vodka
  • essential oil 
  • bamboo skewers (how many you use depends on how many fit in your jar)

I scrounged around my house trying to find a container that would work well. It can be as fancy or plain as you like. I was planning on just reusing something from my collection of saved jars. I couldn't decide between a spice container from Ikea, a bottle from some yummy organic cream, and an old baby food jar (I don't know where that came from, to be honest), but then I remembered a little vase my mom gave me last summer. Though all the others would have worked all right, I liked the vase because it had the smallest opening; the smaller opening keeps the liquid from evaporating as fast.


Fill your jar/vase with the 1/4 cup water. 


Next, add the vodka. The purpose of the vodka is to help emulsify the water and essential oil. I started with two tablespoons but ended up adding a little more when I saw that the oils were still separating from the water.  (Photo credit: my seven-year-old actually used my DSLR and took this photo for me. I was pretty surprised that he got a clear picture!)


Add the essential oils. I started with 10 drops and then gradually added more until the scent was as a strong as I liked. 


Stick the bamboo skewers in the jar/vase and you're done. I read that some people think that you should opt for the actual reed sticks for your diffuser (and I think they're pretty inexpensive) because they work better, but the bamboo skewers work, too. It's what I had on hand so I went with them. So far, so good. Every few days or so, flip the diffusers to refresh the scent.

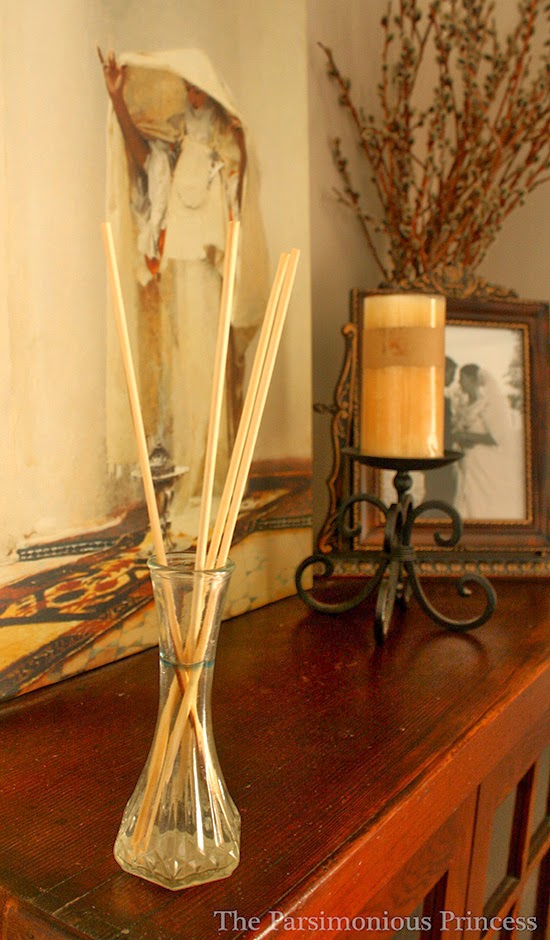
After I made mine, I was feeling pretty proud and I put it in a corner of my kitchen. Not the best idea -- the scent that is put out by this diffuser is subtle and seemed to be pretty easily overwhelmed by the various other aromas and smells that come out of the kitchen. So I moved it to my living room (it seemed like a good spot by that painting, in particular). I could smell it a little but not as much as I'd liked. I was totally bummed -- had my experiment totally failed?

Still not willing to accept defeat, I took it up to my room, thinking a smaller and more enclosed space would be better. Sure enough, that was the ticket. I put it on my dresser and gives off a nice, subtle smell. I'm sure if you used a bigger vase/jar, doubled the recipe, and used more skewers (or actual diffuser reeds), you could use this homemade diffuser in a bigger room. But to use what is pictured here, I suggest keeping it in a smaller, more enclosed room -- like a bedroom or bathroom.

Skip the chemical (and toxic) air-fresheners that don't really smell like anything anyway. Try out this simple air-freshener to give your home a pleasant and aromatic lift.

Note: Some of the links in the post above are "affiliate links." This means if you click on the link and purchase the item, I will receive an affiliate commission. Regardless, I only recommend products or services I use personally and believe will add value to my readers. 

{This post is linked up to The Homestead Barn Hop.}

Wednesday, March 13, 2013

I Made Laundry Detergent! (Again): Easy Homemade Liquid Laundry Detergent

Back in 2010, I made laundry detergent for the first time. I felt so self-sufficient and pioneery. I was amazed that it worked!

Then I stopped using it.

This was due to one factor: I was pregnant. I had made a big batch of detergent using Dr. Bronner's lavender soap and it worked fine. However, as my pregnancy progressed, the smell of lavender made my stomach turn like crazy (probably from grating all that lavender soap during my first trimester). Every time I pulled the container of laundry powder off the shelf and took off the lid, I felt like throwing up. But I couldn't put it in the trash and start with a different scent -- no way was I going to waste a bar of that soap!

So, yeah, it didn't get used for the rest of my pregnancy and once the baby was here, I still didn't use it. I was already getting the detergent at the store for the cloth diapers (I'd read mixed things about using homemade detergents on cloth diapers and didn't want to deal with that). Plus, I was so exhausted and overwhelmed that I just took a break from making detergent. I needed less on my list of things to do. Months later, even though I was taking on some of the things I done regularly before Baby #2 (as well as some new projects), I still just kept on buying the stuff at the store. My baby will be two this month and we just finished up the last of the store-bought detergent.

I've decided, though, to go back to the homemade detergent. I had my washing soda and borax ready to go, as well as a newly purchased bar of Fels-Naptha. But before I unwrapped the soap and pulled out my grater, I decided to look at some of the liquid detergent recipes on Pinterest. Most of them included grating and cooking and five-gallon buckets. Just as I was going to pass on the liquid stuff and stick to the good ol' powder recipe, I saw something different and waaaay easier.

It was a recipe from P. Allen Smith (I love that guy!). His version of liquid detergent couldn't be simpler to make. Seriously -- it takes less than five minutes from start to finish! It also costs much less than store-bought liquid detergent. You can find the video I watched here or you can follow these step-by-step instructions (plus, you'll also find some before-and-after pics like those ones on detergent commercials!):


To make this detergent, you'll need:
  • 3 Tbsp. borax
  • 3 Tbsp. washing soda (NOT baking soda. I used to only be able to find washing soda at Ace Hardware but now that homemade detergent has gotten a little more common, I can find it at Walmart in the laundry aisle.)
  • 2 Tbsp. Dawn dish soap (the blue original kind)
  • water
  • an empty gallon-size milk jug

Pour the borax and washing soda into the empty milk jug.


Add the blue dish soap to the milk jug.

{Note:  I'm all for using natural cleansers and eco-friendly soaps; it's something I've mentioned a bunch on this blog. I totally get that Dawn dish soap is made from ingredients that aren't exactly "natural" (though it is biodegradable and there are no phosphates in it. Plus, the original blue kind doesn't have triclosan in it, either). I don't use this soap on my dishes, where traces of it could actually be ingested, for that reason. That said, I don't feel too worried about washing my family's clothes with this detergent -- it's a couple tablespoons of Dawn that's been diluted in almost a gallon of water, which will be diluted even further in when you use it in the washing machine.}


Add four cups of lukewarm water to the milk jug.


Put the lid on the jug and shake, shake, shake!


Next, fill it up with water from the tap, leaving just a few inches at the top unfilled. Don't worry about all the bubbles coming out as you fill it.


Put the cap on and give the mixture a shake again. I also just turned it upside to help the detergent mixture mix with the water.


Ta-da! Liquid laundry detergent! You could store your detergent in a fancy glass canister or in something with a creative label on it like I've seen on Pinterest or you could go my route: keep it in the milk jug and write on it with a Sharpie.

For each load, use anywhere from 1/2 cup to a full cup of detergent (it all depends on load size. I've been using a cup for all my large loads of laundry). A cup of detergent seems like a lot but since it's so thin and watery, you need to use more. Since it's so quick and easy to make, it's not a big deal that you use so much at a time, I think.

You might be asking now, "So does it actually work?"


I'm pretty sure that is chocolate on my six-year-old's shirt (a souvenir from my in-laws from their trip to South America last year) -- at least I think it is. Anyway, here's what it looked like before. I didn't do any sort of stain removal treatment before throwing it into the wash.


It works! The shirt came out of the wash as clean as ever. I also checked on some other clothes that had mud on them (welcome, spring!) and food stains and the detergent worked on them, too. (Sidenote: I haven't used this detergent with cloth diapers yet. Washing cloth diapers is a whole other topic. I've been using a detergent specifically for cloth diapers. I'll let you know what is if it keeps on working as well as it has). All in all, I'm pretty pleased with this new laundry room development.

Hooray for homemade detergent -- especially when you can make it in just a few minutes!


Note: I have not received any compensation for writing this post. I have no material connection to the brands, products, or services that I have disclosed.

{This post is linked up to Homestead Barn Hop.}

Monday, July 30, 2012

Tipsy Trap: How I Used Beer to Get Rid of Snails


I hate snails with a seething, white-hot hatred. They're vile, loathsome, repulsive creatures. I hate their slimy little guts.

There are a few good reasons for this deep hatred and disgust.

My mom has these pretty orange flowers growing all over in her flowerbeds. (I snapped this picture on the 4th of July -- they're in full-bloom right now). I love them.


Knowing this, my mom potted up a bunch of transplants for my yard. Isn't that sweet?

I couldn't get to planting them right away, so I left them in the backyard like this for a few days, making sure they would get watered regularly by our sprinkling system.  One morning, as I was heading out to feed the chickens, I looked over at my little potted transplants. They were covered with snails! Seriously, there had to be a snail on each one, if not more. It was completely revolting.


My transplants never quite recovered. The stupid snails also did this to my petunias in my front yard -- they ate the blossoms right off during the night. I find them on all sorts of plants and flowers regularly. Grrrr.

Another reason:  these awful things love to congregate around my house at night. One time after dark, I was taking out the trash and I stepped on one. Barefoot. It was one of the grossest experiences of my life.

Last week it rained a few times (hooray!) and the weather seemed to bring them out in droves, so I decided it was time to fight back. They'd eaten too many of my plants and left their little slimy trails all over my driveway and patio long enough. I read a while back that snails are attracted to the smell of beer. There's something about the yeast in the beer that they seem to like. If you put some beer in a dish, they'll go to it to get a drink, get drunk, and drown. Easy enough. Plus, I like the idea of using this natural alternative to any sort of insecticide in my garden.

So I went and bought a big can of beer at a nearby gas station.

{I'd like to pause for a moment and mention the significance of this. I'm 30 years old and this is first time I've bought an alcoholic beverage. A life-long Mormon, I've never so much as tasted even a sip of beer. It felt kind of weird. Plus, I didn't even get ID'd. Aren't they supposed to check if you look under 40? Do I look over 40? As you can imagine, I've developed a minor complex because of this.}


Instead of using a dish or saucer, I went for a more hands-off approach using some empty containers. That way, I could just pick up the container and throw it straight into the trash, dead snails and all.  I also wanted to keep it enclosed just in case my cat got curious. To make my traps, I used an empty vinegar jug and an empty milk carton. You could also use a soda bottle or any other plastic container you have on hand.


On each side of the container, about 1-2 inches from the base, cut out a square hole (again, about 1-2 inches square). I used my husband's pocket knife, but you could use a box cutter, scissors, craft knife, whatever you have on hand.


Next, dig a shallow hole where you want to put the trap. You want the bottom edge of the hole to be at ground level so that the snails can crawl right in.


Pour the beer into the trap, filling the base up to the bottom of the holes on the side. I would suggest doing this in the evening since the things are most active at night.

The trap is set. Now you just have to wait. This is a good time to practice your maniacal  laugh. I know I did.


The next morning, on my way to feed the chickens, I popped open the lid of the snail trap. Sure enough, there were a bunch of them in there and there were others just about to go in. Remember that burning hatred I mentioned before? Well, let's just say I'm feeling a lot better lately.

{This post is linked up to Homestead Barn Hop Frugal Days, Sustainable Ways, and Little House Friday..} 

Friday, July 20, 2012

How Empty Milk Jugs Changed My Garden


Earlier this week, I wrote about some of my various frugal endeavors and experiments, that...well...failed. However, I have one experiment that has been going on in my garden since April that makes up for all of them!


Those little seedlings I mentioned back in early May, the ones I was so nervous to transplant, are thriving! It's borderline crazy how excited this makes me!

I'm guest posting over at The Green Phone Booth today all about my experience with the milk jug mini-greenhouses. Check it out for a recap of the process and how reusing milk jugs changed the way I garden forever!

{This post is linked up to Your Green Resource, Little House Friday, Frugal Days, Sustainable Ways, and Homestead Barn Hop.}

Monday, July 16, 2012

My Latest Frugal Flops & Failures

Blogs can be deceiving -- and a little depressing. I can't tell you how many times I've read other people's blogs and thought, "She has things so figured out."  These people don't have messy floors or ever-growing piles of laundry that need to be put away. They give birth and then wear their pre-pregnancy clothes a couple weeks later. They homeschool, they travel, sew all their children's clothes, make ugly stuff from yard sales look like it came from Pottery Barn, they have a year's worth of meals planned out, and they give bars of homemade soap as gifts. Some days, I feel accomplished that I got a shower into my schedule before 3:00 PM. That's when I start comparing myself to them and this is never a good thing. As Theodore Roosevelt once said, "Comparison is the thief of joy."  

But here's the funny thing:  I had someone tell me fairly recently that I seemed to have everything figured out, that I seemed like I was organized. I wanted to laugh and hug the person at the same time.

Thing is, we bloggers, for the most part, put our best faces forward. We write of the things that are going well in our lives, the things that we're proud of. For example, I'm happy to put a photo of my garden on here, but you won't see any wide-angle photos my lawn (it's patchy and has a bunch of weeds in it). I'm more than happy to write a post about canning salsa or cloth diapering, but I'm probably not going to give much advice on organization or time management. I usually only show the things that work out, the things that I'm proud to show to anyone who will look.

That said, I thought it would be kind of fun to lift the curtain and show you some of my latest frugal flops. I love to experiment around my house and in the yard (it keeps things interesting!) -- sometimes they work, sometimes they don't.  Oh well. Incidentally, if you've tried any of these things and had success, I'd love to hear about it!

Flop #1 - Homemade Seed Tape


I read about homemade seed tape on Pinterest first and then in a book. I figured if two people could attest to it, then it had to work, right?  I spent some time one afternoon (during valuable baby naptime, no less) making carrot seed tape. I hate planting carrot seeds because they're so tiny -- I don't like just scattering a bunch (what a waste!), but it's sort of a pain to crouch over the dirt and plant each speck of a seed one by one. So when I read that you could glue the seeds onto strips of toilet paper and then plant them all at once (and evenly spaced), I was excited. I got all the supplies together -- seeds, toilet paper, and homemade paste (flour and water) -- and got to work. I took so many pictures of the process, thinking, "I can't wait to share this on the blog!"

Once I'd finished sticking those seeds on the toilet paper strips, I planted the tape, patting myself on the back. This was the way to plant carrots!  I covered them with dirt, watered them, and waited. And waited. And waited. I'm not sure what happened. Maybe I didn't water them enough, I can't be sure. All I know is that over a month later, I finally gave up and turned the bed over to plant something else. You can bet that there was a bunch of dried toilet paper that came up with the rake. Incidentally, I just replanted carrots not too long ago and discovered today that they're all sprouting, so it wasn't the seeds that were bad. I don't know where it went wrong -- the idea is great, but I just don't know if I want to spend the time to try it ever again.

Flop #2 -- Homemade Dish Soap
I found a recipe for homemade dish soap on a blog and quickly pinned it. Homemade dish soap for pennies? Could it be true? The recipe called for castile soap, water, and vinegar. As you may know if you've read this blog for a while, I love castile soap. Don't even get me started on my love for vinegar. So, once we were finished with our store-bought soap, I mixed the soap, water, and vinegar together and filled the dish-filled sink with water. I added the dish soap. It didn't work at all. I might as well have just used water. I just didn't understand -- how did castile soap and vinegar let me down?  I did a little research and found out that vinegar and castile soap sort of cancel  each other out when they're mixed and stored together (here's the link where I learned about that). Thankfully, I only made a little, so there wasn't much waste. Plus, I can always use the extra castile soap for something else.

Flop #3 -- Soap Nuts


I so wanted these to work. Have you ever heard of soap nuts? They're basically this dried fruit that people have used for centuries to clean clothes. The soap nuts contain saponin -- an all natural soap. I did lots of reading and research before buying them. There were so many testimonials from people completely happy with them. I even read great reviews about washing cloth diapers with soap nuts. I figured hundreds of years of use says a lot. Plus, I could compost them when they were used up! I was sold. I told my husband about them and he was pretty skeptical, but, being the awesome and patient guy he is, he was open-minded about the experiment. 

It's tricky with these things -- you can't really tell if they're working while they're in the wash because you don't get the suds in the water like you do from regular laundry detergent.  I washed a few loads with them. The clothes seemed clean but I worried about it in the back of mind. I even washed a batch of cloth diapers with them. The clothes and diapers smelled like, well, nothing after I washed them (which is a good sign).  However, it didn't seem to take long for the nuts to lose their oomph. To test if they're still good to use, you squeeze them when they're wet -- if a sticky substance oozes from them, they can be used again. After a few washes, I was mostly squeezing water out of them. I got nervous about my laundry. The diapers started getting a strong ammonia smell for the first time ever (which was weird because I'd read that the soap nuts actually stripped diapers and prevented ammonia build-up). So I stopped using them. Looking back, I think the problem is our really hard water (a byproduct of living next to mountains).  I still have the soap nuts. I want to use them. Any suggestions or help would be much appreciated.

Flop #4 -- Healing Clay Poultice


Well, it finally happened: I got my first sting since becoming a beekeeper. It's my own fault -- I got lazy and decided to not wear boots. Sure enough, one of our little bees (at the very end of the inspection, I might add) decided to land on the top of my foot and sting me. I've been stung by bees before with hardly any sort of reaction, but this time my whole foot and ankle swelled up like a balloon (that explains why my foot and toes look so big in this picture)! I should have just taken a Benadryll and been done with it, but since we didn't have any on hand (we do now), I thought I would try out a different remedy first.

My mom is the one who introduced me to "healing clay". She had visited a health store and gotten a free sample. Apparently, this stuff is supposed to heal all sorts of things (according to the informative pamphlet that came with the sample), including bee stings. In fact, one of the testimonials actually said that the clay poultice had pulled out the stinger from the sting site. One man said that his hand had been stung by wasps twelve times -- he put the clay on it and his hand was better an hour later.  The pamphlet had all sorts before and after pictures, so it seemed like a viable option. I mixed up some clay with some water, slathered it on my foot, wrapped it in some plastic wrap (so it wouldn't dry out too quickly -- this was also in some of the testimonials I read), and let it sit for a good while. I felt pretty silly walking around the house with my foot in plastic wrap. The clay helped a little with the pain and the itching, but it did absolutely nothing for the swelling. Once the clay dried out and I rinsed it off, my foot hurt just as it had before and it still looked terrible. Thankfully, the swelling subsided as time went by and after a couple days or so, I was back to normal. But why was my experience with clay so different than the ones I read about? Why didn't it affect my bee sting?

I'll give the clay another try, but it didn't work in this instance. Maybe I'll just use it for a facial. And I'll always wear my boots during inspections.

Tuesday, June 26, 2012

It's a Stain Removing Miracle!

It was pretty much a perfect afternoon.


My parents decided to take all the grandkids to a gorgeous local garden. They ran all over the place -- Max and his cousins were busy smelling flowers, sticking their hands in fountains, rolling (repeatedly) down an enormous hill, bathing their feet in a stream, playing in the sand, looking for birds and bunnies. Grandma even treated all of them to chocolate ice cream cones.

My boy got chocolate ice cream all over his shirt.

It wouldn't have been a big deal, but that shirt just so happened to be one my favorites. I splurged on that shirt -- it has the original cover art from The Wizard of Oz on it and I got for it him after we finished reading the book together (it was our second time -- such a great read-aloud). What can I say? I get sentimental about clothing.

Oh, and did I mention it was yellow? Pale yellow. I have since learned my lesson that you don't buy light colored shirts for little boys.

I took it home and used my arsenal of stain-tackling techniques: a diluted dish soap solution, then vinegar, then hydrogen peroxide. I soaked it. I scrubbed it. It went through multiple wash cycles. I let it hang on the clothesline for hours, hoping the sun would bleach it away. None of it worked.

A few days later, just as I had decided to wave the white flag and give up on the shirt, I saw a recipe for a miracle stain remover on Pinterest.

The recipe is simply one part Dawn dishwashing soap (the original blue kind -- I actually already had this on hand since it makes the best homemade bubble solution), one part baking soda,  and two parts hydrogen peroxide.


I mixed it all up and started brushing it into the chocolate stains. It came up easily. It made me a little giddy, I won't lie. Like I've said before, I love me a good homemade cleaning concoction.


There was one spot on the Cowardly Lion's face that was particularly stubborn. Even when the chocolate stains had faded slightly with my previous attempts, this spot didn't budge. Armed now with my miracle stain remover, I channeled Lady Macbeth and scrubbed. "Out, damned spot! out, I say!"  It may have faded some of the lines on the Lion's face in the end, but the spot washed out as far as I could tell. With that, I put the shirt into the wash, the whole front of it soaked and covered in soap suds, and crossed my fingers.

A wash cycle and some time on the clothesline later...


Not a single chocolate ice cream stain to be found!  Like I said before, all my scrubbing may have faded the Lion's face a tad, but it still looks much better. Plus, it works with the worn, vintage feel of the shirt anyway.

Ah, Pinterest saves the day. Again.

Note: I have not received any compensation for writing this post. I have no material connection to the brands, products, or services that I have disclosed.

Monday, May 7, 2012

In the Backyard: My Milk Jug Mini-Greenhouses

A little over a month ago I mentioned how I was cleaning and saving my family's empty milk and vinegar gallon-sized jugs for a seed-starting experiment. I was introduced to the idea of winter-sowing through the blog A Garden for the House, where he claimed that you didn't need to do much to start seeds. No special lights, no seed-starting kits required -- you didn't even need to keep them inside! Since I don't really have a space in my house to devote to seed starting (I guess there's one space that would have worked, but that spot had a chick brooder up until a couple weeks ago), I was instantly interested in trying this method out.

I'm so excited to be starting my own seeds, especially my tomato seeds. I've grown lots of things from seed but never tomatoes. I always just cop-out and buy the transplants after the last frost date. Even though the results are great and totally worth the expense ((mmmmm....homegrown tomatoes. Is there anything better? I'm dreaming about this recipe already.), it's not the most frugal way to grow a garden. For the same price as a single tomato plant at the nursery, I can get a packet of seeds and grow waaaay more tomatoes.  It's pretty much a frugal no-brainer. So why is this first year I'm actually starting my seeds? Simple answer: intimidation. Again, I thought I'd need all sorts of special equipment and fluorescent lighting rigged up.

Nope. To start seeds, you just need some seeds (obviously), some potting soil, duct tape and some gallon-size jugs. 


Although I highly suggest reading all about winter-sowing on the blog I mentioned previously, I'll just quickly run through how I went about creating my mini-greenhouses.

To start, I cut all the clean, empty jugs almost completely in half around the middle of the jug, only leaving a one-inch section uncut. This way the jug is still connected but also opens for easy access. The uncut part sort of acts like a hinge.


Next, I made about 15 holes in the bottom of the jug and a couple holes on each side of the jug (about an inch or so above the base).  This allows for proper drainage and ventilation. Speaking of ventilation, remove the caps from whatever jug you're going to be using.


Next, fill each mini-greenhouse with a few inches of potting soil, wet the soil thoroughly, and then plant the seeds. It's important to keep in mind the calendar when you're deciding what to plant. For instance, I wouldn't start tomato plants in these mini-greenhouses in February. That would be way too early. Instead, I waited until April (as you can see labeled on the jugs) to plant them. For a complete list of what to winter-sow and when, click here.

Once your seeds are planted, close the jug and seal it shut with some duct tape. Since it's windy where I live, I put my greenhouses in a plastic storage container to keep them from blowing away. Once the greenhouses are sealed, be sure to label what you've planted and when they were planted.

Then you wait. Occasionally check to see if the soil is too wet or dry. Sometimes I'll spray some water over the top of the greenhouses with the hose. Since you're keeping these outside, you'll also get moisture from rain and snow.

A few weeks after I planted the greenhouses, I was feeling pretty frustrated. The insides of each greenhouse showed no progress. Not even a single little sprout. I was so discouraged. The method had come so highly recommended! I was getting ready to plant again but then I saw them...


They were in my tomatillo greenhouse first: tiny little sprouts, as cute as can be, growing away despite the chilly nights outside.  Then the slicing tomato seeds started to sprout and then the San Marzano paste tomatoes. I was so excited! It actually worked!

It's been about a week or so since I took this picture. The sprouts have grown so much since then! They're actually starting to look like the transplants I used to buy at the store!  Every time I check them, there are more and more little plants emerging.

Our last frost date where I live is around Mother's Day, so I'm going to be putting them into the ground soon. I'm not going to lie -- I'm pretty nervous about transplanting my cute little seedlings.  At the same time, I still feel excited and optimistic about it, especially since, according to the blog I keep referencing, winter-sown plants are said to be more hardy than ones started indoors.  We shall see.

Hooray for experiments that actually work -- especially if they produce delicious and juicy tomatoes!

Monday, March 26, 2012

Clothesline 101: How to Get Softer Line-Dried Clothes

Spring makes me giddy. The boys and I have spent the last couple days out in the garden, digging, planting, and playing in the mud. How we've needed some fresh air in our lungs and some dirt under our fingernails! One other thing I've been looking forward to through the winter months: the return of the clothesline. I'm telling you, I've missed that sweet dried-on-the-clothesline smell!

A couple years ago when I decided to start hanging our clothes outside to dry, my husband was a little less enthusiastic about the idea than I was. He hated how stiff clothes get when they're dried on a clothesline. To be honest, I felt the same way, but having that line-dried, fresh air smell on our clothes and sheets was worth it to me. {I still don't line dry my towels, though.}

So I understand why some people would skip clotheslines because of the stiff clothes, especially when we're all so used to soft and fluffy laundry. There are ways to keep your laundry from feeling like cardboard when line-drying. Granted, these solutions won't make your clothes feel exactly like they do when they're warm and soft from the dryer, but they do make a difference.

Solution #1 -- Vinegar
Ah, vinegar. *sigh* Is there anything it can't do?  I've been using vinegar in place of dryer sheets and fabric softeners for a couple years now. Vinegar is a natural fabric softener. I keep a jug of white vinegar in my laundry room and whenever I do a load of laundry, I pour about 1/4-1/2 cup of it into the washing machine's agitator (where the fabric softener dispenser is). If your machine doesn't have a designated spot for the fabric softener, you can just pour in the vinegar during the rinse cycle yourself or use one of those fabric softener balls. Don't worry: adding vinegar to your washing machine will not leave your laundry smelling like a salad. The vinegar smell disappears once the clothes are dry.

Using vinegar on your line-dried laundry does help with softening it a bit, but your laundry may still have the roughness and stiffness. Enter Solution #2....

Solution #2 -- The Dryer
It seems odd to use your dryer, I know. Doesn't that defeat the purpose? Nope. Last year, when I mentioned how stiff and rough my baby's line-dried diapers were, my mom suggested doing what she did for years (after my grandma suggested it to her) and throw them in the dryer before hanging them. I'd always heard of tossing laundry in the dryer after they were on the line to soften up dried clothes, but I never did it. When I take my laundry off the line, I usually like to fold it right there and put it the basket (folding laundry is much nicer outside in the sunshine, you know?).  Putting it in the dryer before I put it on the line made more sense to me. So, lately, I've just been putting it in the dryer for ten minutes on the 'fluff' setting. This way, it's not heated and uses hardly any energy, so as not to defeat the money-saving purpose of line-drying altogether.

But does it really make a difference? Does the extra step make clothes softer?  I did some quick tests just make sure. I mean, I was doing the laundry anyway...

First, I tried it with two of my son's shirts. The green shirt was fluffed in the dryer and the orange one was put directly on the line after I took it out of the washing machine. Was there a difference? I'll be honest: not much of one. I had my husband close his eyes and tell me which one was softer: he chose the green one, though he also said that it was "just barely softer."

So tried it again the next day with a batch of cloth diapers.  The diaper on the left was put in the dryer, the one on the right was put directly on the line. I didn't take this picture at an angle -- the straight-from-the-washer diaper was more bunched up and wrinkled than the other, making it look smaller.

Up close, you can see the difference between the two (I took this picture at about the halfway-dry point). The diaper on the right is a lot more stiff and holding all those wrinkles in place.

{Sidenote: the house behind mine is for sale. There have been tons of people looking at the place over the last few days. Of course, right when I was busy taking pictures of wet diapers on a clothesline, I looked up and saw some prospective neighbors looking directly at me, most likely wondering what kind of weirdo takes pictures of wet diapers on a clothesline. Nice.}

Once the diapers were dry, I brought them in for the final test. The diaper on the right, the one that was taken straight from the washing machine, was definitely more stiff than the other. You can actually see how it held its shape on the clothesline by the way the top-center of the diaper sags in the middle like it did while it was hanging. The diaper on the left, the one fluffed in the dryer first, is still a little stiff, but not nearly as much as the other. The difference between the two diapers was much more noticeable than it was with the shirts.

Solution #3 -- Ignore it.
That may seem like not much of a solution, but it is. Sure, the stiff clothes bugged me a bit at first, but it's really not a big deal anymore. Everyone in my house is pretty used to it. Once you've worn the line-dried clothes for a little while, the stiffness goes away anyway. Plus there's a trade-off in all of it: you might not have the softness the dryer produces, but you get that wonderful smell of clothes dried in the sunshine and the breeze. Oh yeah, and it saves money, too (almost six percent of your annual household energy usage). Seems like a pretty decent trade-off to me.

Wednesday, March 2, 2011

Stretching Out the Soap

File this one under a couple headings:  "Why didn't I think of this before?" and "Is this too obvious to post?" 

I finished reading a book about cutting down your grocery bill a couple weeks ago (book review to come soon) and among the many suggestions in the book was how to stretch out your dish soap by {gasp!} watering it down. Rocket science, I know.

According to one site I read, most dish soap is far too concentrated to begin with. In fact, cutting dish soap with water allows the soap to emulsify and spread out quicker on your dishes. This also makes rinsing easier -- no big (undetected) globs of soap that require extra rinsing.

I have a friend who says that we're twins except for the fact that she doesn't have kids and that she "uses normal dish detergent." Yes, I splurge for the eco-friendly stuff (though I do try to buy it on sale and sometimes even with a coupon). To me, it's worth an extra dollar or so. BUT, I would love to cut my costs, especially since I go through the stuff pretty quickly - I can use up a bottle of dish soap in about a week and a half. Sometimes, when I've been baking and cooking a lot, I can use it up faster than that.

The soap I use is pretty concentrated. With a few squirts, I can get my sinkful of dishes quite soapy. In fact, I often use more than I need. The dishwater is usually, to my son's delight, overly bubbly. So I decided to try watering it down. In the past, I've successfully used watered-down dish soap (as in, when the bottle is basically empty and I'm trying to get the last of the soap out).


Once my bottle of dish soap was empty, I grabbed the new bottle I'd just bought.  I filled the just-emptied bottle half-way with the new stuff, added some water, and -presto!- I have two bottles of dish soap instead of one.  You could also buy a new bottle for your watered-down soap -- my mom uses a tall olive oil dispenser for her soap, which looks nice next to her sink. 

Depending on how concentrated your dish soap of choice is, you'll have to determine how much you can water it down and still have it be effective.

So does it work? After a few weeks, I've hardly noticed a difference. Well, except that I've been buying dish soap less.
Related Posts with Thumbnails