Thursday, April 12, 2012

Adventures in Cloth Diapering: The Diapers My Baby Wears


My sweet baby turned one year old a little over a week ago.  When we first brought him home, we had a pretty ample supply of disposable diapers given to us by the hospital. After about a week, they ran out and we switched to cloth diapers. So, it's safe to say, that my husband and I have been cloth diapering our baby for a year now. Believe it or not, I prefer cloth to disposables.  Really. Our little guy's diapers rarely leak (no "pooplosions"), he hardly ever gets diaper rash, and I LOVE not buying diapers.

Whenever I tell people I cloth diaper my baby, I first get the inevitable look of bewilderment and/or disgust, then I get asked what kind of diapers. Most people have the same idea of cloth diapers I did before I looked into it -- their point of reference is the old-fashioned cloth diapers (big and flat, that needed to be folded like origami), safety pins, and plastic covers. That's how my mom diapered me and my brothers in the 1980s and I figured it hadn't changed since then.  Wrong. Cloth diapering has come a long way and there are lots of options out there.

In this post, I'm going to share what diapers my baby wears, along with the pros and cons of each type. There are so many different brands and types of diapers out there, so this list is by no means comprehensive. I haven't tried every brand or kind of diaper on my baby. Also, no one is paying me to say nice things about the diapers they make (not that I would be opposed to anyone sending me free diapers to review...).  All of this is purely my opinion and experience, so take it for what it's worth!

Diaper #1 - Bummis Easy Fit Pocket Diaper


The Bummis Easy Fit diapers (along with the Bummis Tini Fit) were the first cloth diapers I purchased. I'd read a lot of reviews of them and thought they'd be the best for us. It seemed like an easier transition from the familiar disposables.

Pros: 
  • These diapers fit your baby the entire time he or she is in diapers, thanks to the rows of snaps that let you adjust the size. My baby wore these diapers as a newborn and he wears the same ones now.
  • Well-made, high quality materials. The insert is made of a bamboo rayon fabric and polyester microfibre, making it really absorbent. Made in the UK. 
  • The insert is attached to the diaper, making it really convenient (no need to find accompanying inserts like with other pocket diapers). When I'm packing my diaper bag before going out, my first choice of diapers to pack are the Bummis because I know I've got everything I need.
  • They go on quickly, just as fast as a disposable diaper would. 
  • These diapers are easy to wash. The insert comes out by itself in the washing machine. If the diaper is wet, you can toss it right into your pail; if it's poopy, just rinse it off and put it in the pail. No fishing out icky liners like with regular pocket diapers.
  • They have a trimmer fit than most cloth diapers. Still bulkier than disposables, not too much.
  • In my opinion, these are the best diapers for reluctant spouses and babysitting grandparents because they're easy to use and, of all the ones we own, they are the most similar to disposables. 
  • It doesn't really matter that much in terms of performance, but I like the looks of these diapers best. I also prefer the Velcro tabs to snap enclosures (the Velcro has held up beautifully after a ton of washings). And I really like the colors the diapers come in, too.
Cons:
  • At $25 each, they're a pricey choice. I bought ours for less (around $16-18 each) through an online baby shop -- I'd give you the link to it, but the reason I got the diapers so discounted was that she was closing her shop. Do a little searching and you may find a good deal. 
  • I hate to say it since they're the most expensive, but of all the pocket diapers we've used on Jonah, these have leaked the most. As I was writing this post, I asked my husband which diapers he preferred and he said that the Bummis at the bottom of his list, saying that they are "leaky, leaky, leaky".  They haven't leaked when the diaper is poopy, but they definitely have when the baby's diaper was wet. I think this may have had something to do with the way the diaper's leg openings fit around his extra-chubby legs in his pre-solid food days (when he was in the 80th percentile for his weight). He has since slimmed out a little since he started solids (as is expected, though he is still a beautifully chubby little guy) and they've seemed to leak less often. 
  • (UPDATE: About two years into our cloth diapering experience, these ones started to show their wear the most, especially the elastic around the leg openings. The fabric also started to wear away to the point of leaving holes, again mostly around the leg openings. For how much these cost, I was pretty disappointed.)
Diaper #2 -- GoGreen Pocket Diaper "Champ 2.0"

After I'd ordered a few of the Bummis, I discovered GoGreen Pocket Diapers. I was relieved to see that I could find pocket diapers that were a lot less expensive than the others (like Bummis and other brands) were.  GoGreen sells a couple different types of pocket diapers and the ones we use the most are their Champ 2.0 pocket diapers.

Pros: 
  • The price. At $15.95, the Champ diapers cost a whole ten dollars less than the Bummis. That's a great deal for pocket diapers (though the Champ diapers aren't the cheapest ones GoGreen offers. More on that later.).
  • Like I mentioned before, my little guy wore these as a newborn and he wears the same ones now. Once you buy them, you don't need to worry about getting bigger sizes.
  • The four rows of snaps make the Champ diapers extra adjustable. The Bummis only have three snaps, which made them a little harder to use on a newborn. Jonah was able to wear the Champ diapers when he was only a few weeks old. It was bulky, but it worked!
  • You can get one of these on baby super-quick, too.
  • Though the insert isn't attached like the Bummis insert is, the inserts in these diapers snap in. When you wash the diapers, the insert stays (most of the time) snapped but it also agitates itself out of the pocket. With these diapers, there's no need to fish out the insert before putting it into the diaper pail or washing machine. As you can probably tell, not having to get the insert out of a pocket diaper is a big plus for me!
  • I love the double-gussets at the leg openings. This keeps everything inside the diaper better, especially important when you're dealing with runny breastfed/bottle-fed baby poo. We've had some wet leaks but no poop leakage. Adding an extra insert fixed the wet leaks right away.
  • There are two openings openings which not only allow the inserts to come out on their own in the wash, but it also makes stuffing the diapers easier and quicker. No worries about bunching and twisting of the the liner. Also, the dual openings make it easier to add additional liners, like the hemp/cotton ones I use for the baby at night sometimes.
  • Again, not that it really matters, but there are a lot of fun prints and colors available with GoGreen diapers. You can go as plain or wild as you want with them. (Max calls Jonah's star-print diapers the "Captain America diapers".)
  • Great customer service. When one of my diapers arrived with a broken snap, they replaced it really quickly. Also, they have a flat $5 shipping fee on all US orders.
  • These are the only diapers my baby wears at night because they work the best with the hemp insert. For more info on how I diaper my baby at night, check out this post.
Cons:
  • I'm not completely nuts that they're 100% polyester. The fleece material on the inside does wick away the moisture away from my baby really well, but I'd rather have natural fibers instead of synthetic ones against his skin. Not a huge deal, but worth mentioning.
  • Since they're polyester, they seem more prone to ammonia build-up than cotton diapers which makes them smell a little, even after they're washed. GoGreen has started to offer a new product for stripping the diapers, but I haven't tried it.
  • I prefer the Velcro enclosures on the Bummis over the snap enclosures on the GoGreen diapers, especially when the baby being changed is feeling extra grouchy and/or wiggly.
Diaper #3 -- GoGreen Pocket Diaper "Solid Silky"


I bought three of GoGreen's regular pocket diaper when I was getting the Champ diapers because they were on sale for $7 each. I figured they were worth a try.

Pros:
  • Like with the Champ diapers, the price! GoGreen's regular pocket diapers are very affordable, running at $9.99 each (plus, the flat $5 shipping rate on all US orders.).  
  • Since the inside is made of fleece, they keep baby's skin dry and comfortable. Like the Champ diapers, both the inside and outside of the diaper has held up well after many, many washings.
Cons:
  • Fishing out the inserts in poopy diapers. It doesn't really bug me to pull out the insert out of the pocket when the diaper is wet, but when you have a really poopy diaper to take care of, pulling out the insert is pretty gross.
  • Again, I'm not a huge fan of synthetic materials; I prefer natural fibers against his skin. And, as I said before, the polyester seems more prone to ammonia build-up.
  • Only one row of snaps across the top makes it seem a little less secure than the two rows that the Champ offers.
  • The inserts do have a tendency to bunch and twist since there's nothing keeping them in place except the pocket itself.
  • It takes a little longer to stuff the inserts in the pocket diapers than with the Bummis and Champ diapers, but not long enough to be a huge deal.
Diaper #4 - Green Mountain Diapers Cloth-eez Prefolds


When I first talked to my husband about using cloth diapers for our baby, he agreed to it on the condition that we wouldn't use "those flat diapers".  And I agreed. Prefolds seemed like they would be a big hassle.  Then I started ordering the pocket diapers and realized that it would cost a lot to exclusively use pocket diapers. 

So I decided to just look into prefolds. I came to the conclusion that they wouldn't be so bad and told my husband that if he really didn't want to deal with them, I would put them on the baby during the day while he was at work. Just a week or so into cloth diapering, my husband and I both decided that we liked the prefolds better than all the pocket diapers. Who knew? It came as a complete surprise that we preferred the Cloth-eez prefolds sold by Green Mountain Diapers (along with the Thirsties covers and a Snappi) over everything else!

Pros:
  • The PRICE! Even though $10 is a great deal for a single pocket diaper, you get way more for your money with prefolds.  The prefolds' (depending on whether you get regular or organic cotton and what size you get) price range is $2-4 per diaper. You do have to buy a few covers in addition to the diapers  (the Thirsties covers are awesome -- they run at about $10.00 each) which adds to the cost, but you only need a few covers. If you bought a dozen newborn Cloth-eez diapers and four Thirsties covers, your total cost would still be just less than $70 (plus shipping). Wow. 
  • All of our pocket diapers have leaked a little from time to time (mostly just wetness around the leg openings). The prefold-cover combo has NEVER leaked. Seriously, never. Granted, this is due to the   Thirsties covers (they have gussets by the leg openings that catch everything so well) more than the prefolds themselves. 
  • Prefolds are so much easier to rinse than the pocket diapers. It's harder and takes longer (even with the help of my handy diaper sprayer) to get the pocket diapers poop-free because of the nooks and crannies. The flat prefolds rinse off faster and easier.
  • I love that they're 100% cotton. Not only is it better against baby's skin, but they don't get as smelly or need to be stripped as soon as the polyester ones need to.
  • Even though you do have to buy bigger sizes of diapers and covers as baby grows, I don't mind because I like how they fit at each stage. He wore the one-size-fits-all pocket diapers when he was only a few weeks old, but they were pretty bulky on his little newborn frame. The newborn prefolds fit perfectly (and they looked super cute on his little body!).
  • Once you're completely done with cloth diapering, you can reuse the diapers for household chores.
Cons:
  • Unlike the pocket diapers we bought that fit from birth to potty training, you do have to buy bigger sized diapers and covers as baby grows. So far, we've bought the orange-edged newborn size, the yellow small size, and the brown large size. We've been using the brown-edged large ones for most of the time. This isn't a huge con, in my opinion -- I think it actually spreads out the cloth diaper start-up cost better. 
  • Once babies realize they can roll, wiggle, and crawl away, diaper changing can be a struggle, no matter what you use. I've gotten pretty fast at getting those prefolds on my baby, but if he's super-wiggly or fussy, having to get the diaper on him, along with the Snappi (you can forgo the Snappi, but I like how it keeps things together) and the cover, can get tricky.
  • They're not the best diapers for taking on the go. When I have to change the baby at one of those restroom changing tables that folds away from the wall, I want to get him on and off as fast as I can. That's a situation where I prefer the pocket diapers. Pocket diapers are ready-to-go and easy grab from my bottomless diaper bag
  • I don't use prefolds at night. I use the Diaper Champ diapers at night exclusively. 
  • Prefolds aren't really the best diapers to leave with a babysitter or grandparent that isn't used to them. There is a bit of a learning curve to using them -- not much of one, but there still is one. Pocket diapers resemble the familiar disposable diaper more.
****

Whew! That's a lot of diaper info. Again, the list isn't comprehensive. There are a lot of different kinds of diapers and brands on the market. If you cloth diaper, I would love to hear what has worked best on your baby.

Note: Some of the links in the post above are "affiliate links." This means if you click on the link and purchase the item, I will receive an affiliate commission. Regardless, I only recommend products or services I use personally and believe will add value to my readers. 

{This post is linked up with Your Green Resource. Check it out -- lots of great ideas!}

Thursday, March 29, 2012

Off the Needles: The Laurel Love Cocoon

I didn't know how to knit when I was pregnant with either of my boys so I never did the excited, nesting sort of knitting. I wish I had. There's something just sort of lovely about an expectant mom knitting blankets, bonnets, and booties.  {Speaking of babies, my sweet little baby turns one year old tomorrow. Already.}


However, there has been a new arrival in our extended family since I learned to knit: my cute little nephew, Everett. I figured it was a perfect opportunity to knit this "love cocoon". Not only did it seem like a good beginner-level project, but it looked so sweet and snuggly.

{Photo courtesy of my brother-in-law, Richard.}

This project came together pretty quickly -- well, once I figured out how to do the magic loop technique. When I first started it, I hadn't read the instructions that well and was so confused why I would be using a 40" circular for only 40 cast-on stitches! Anyway, I watched a few different video tutorials about magic loop and found this one from VeryPink to be the most helpful. It took a little bit of trial and error to get the technique down. I'm so glad I learned it, though, because I've used it a couple times since (in my attempt to avoid double pointed needles -- they seem so tricky!).

For this project, I used a skein of super-bulky, washable blue yarn and a size US 13 40" circular needle. (You can find my Ravelry notes here). The Laurel Love Cocoon pattern (which you can find here for free) is well-written and so simple to follow. I can't recommend it enough. It makes for a wonderful and personal baby gift. In fact, I'm going to be casting on soon to make two more of them for my twin nephews coming in July. Newborns are usually happiest when they're swaddled and I can't think anything nicer than swaddling them up in something that has love knit into every stitch.

Monday, March 26, 2012

Clothesline 101: How to Get Softer Line-Dried Clothes

Spring makes me giddy. The boys and I have spent the last couple days out in the garden, digging, planting, and playing in the mud. How we've needed some fresh air in our lungs and some dirt under our fingernails! One other thing I've been looking forward to through the winter months: the return of the clothesline. I'm telling you, I've missed that sweet dried-on-the-clothesline smell!

A couple years ago when I decided to start hanging our clothes outside to dry, my husband was a little less enthusiastic about the idea than I was. He hated how stiff clothes get when they're dried on a clothesline. To be honest, I felt the same way, but having that line-dried, fresh air smell on our clothes and sheets was worth it to me. {I still don't line dry my towels, though.}

So I understand why some people would skip clotheslines because of the stiff clothes, especially when we're all so used to soft and fluffy laundry. There are ways to keep your laundry from feeling like cardboard when line-drying. Granted, these solutions won't make your clothes feel exactly like they do when they're warm and soft from the dryer, but they do make a difference.

Solution #1 -- Vinegar
Ah, vinegar. *sigh* Is there anything it can't do?  I've been using vinegar in place of dryer sheets and fabric softeners for a couple years now. Vinegar is a natural fabric softener. I keep a jug of white vinegar in my laundry room and whenever I do a load of laundry, I pour about 1/4-1/2 cup of it into the washing machine's agitator (where the fabric softener dispenser is). If your machine doesn't have a designated spot for the fabric softener, you can just pour in the vinegar during the rinse cycle yourself or use one of those fabric softener balls. Don't worry: adding vinegar to your washing machine will not leave your laundry smelling like a salad. The vinegar smell disappears once the clothes are dry.

Using vinegar on your line-dried laundry does help with softening it a bit, but your laundry may still have the roughness and stiffness. Enter Solution #2....

Solution #2 -- The Dryer
It seems odd to use your dryer, I know. Doesn't that defeat the purpose? Nope. Last year, when I mentioned how stiff and rough my baby's line-dried diapers were, my mom suggested doing what she did for years (after my grandma suggested it to her) and throw them in the dryer before hanging them. I'd always heard of tossing laundry in the dryer after they were on the line to soften up dried clothes, but I never did it. When I take my laundry off the line, I usually like to fold it right there and put it the basket (folding laundry is much nicer outside in the sunshine, you know?).  Putting it in the dryer before I put it on the line made more sense to me. So, lately, I've just been putting it in the dryer for ten minutes on the 'fluff' setting. This way, it's not heated and uses hardly any energy, so as not to defeat the money-saving purpose of line-drying altogether.

But does it really make a difference? Does the extra step make clothes softer?  I did some quick tests just make sure. I mean, I was doing the laundry anyway...

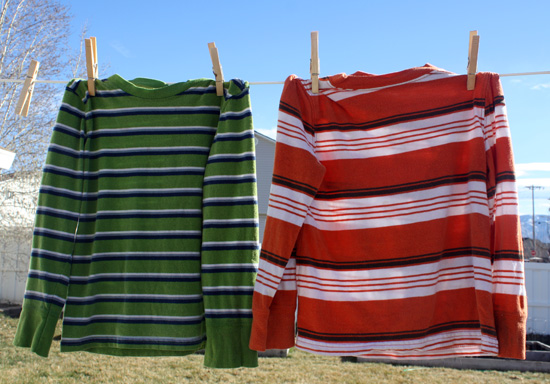
First, I tried it with two of my son's shirts. The green shirt was fluffed in the dryer and the orange one was put directly on the line after I took it out of the washing machine. Was there a difference? I'll be honest: not much of one. I had my husband close his eyes and tell me which one was softer: he chose the green one, though he also said that it was "just barely softer."

So tried it again the next day with a batch of cloth diapers.  The diaper on the left was put in the dryer, the one on the right was put directly on the line. I didn't take this picture at an angle -- the straight-from-the-washer diaper was more bunched up and wrinkled than the other, making it look smaller.

Up close, you can see the difference between the two (I took this picture at about the halfway-dry point). The diaper on the right is a lot more stiff and holding all those wrinkles in place.

{Sidenote: the house behind mine is for sale. There have been tons of people looking at the place over the last few days. Of course, right when I was busy taking pictures of wet diapers on a clothesline, I looked up and saw some prospective neighbors looking directly at me, most likely wondering what kind of weirdo takes pictures of wet diapers on a clothesline. Nice.}

Once the diapers were dry, I brought them in for the final test. The diaper on the right, the one that was taken straight from the washing machine, was definitely more stiff than the other. You can actually see how it held its shape on the clothesline by the way the top-center of the diaper sags in the middle like it did while it was hanging. The diaper on the left, the one fluffed in the dryer first, is still a little stiff, but not nearly as much as the other. The difference between the two diapers was much more noticeable than it was with the shirts.

Solution #3 -- Ignore it.
That may seem like not much of a solution, but it is. Sure, the stiff clothes bugged me a bit at first, but it's really not a big deal anymore. Everyone in my house is pretty used to it. Once you've worn the line-dried clothes for a little while, the stiffness goes away anyway. Plus there's a trade-off in all of it: you might not have the softness the dryer produces, but you get that wonderful smell of clothes dried in the sunshine and the breeze. Oh yeah, and it saves money, too (almost six percent of your annual household energy usage). Seems like a pretty decent trade-off to me.

Thursday, March 22, 2012

Random Reuses: Bread Tabs, Paper Bags, and Other Miscellaneous Items

As I've said many times before on this blog, I'm always looking for creative ways to reuse something, even if it's just once, before throwing it into the trash. Here are a few reuses around my house...

Old bread tab = less time spent fiddling around the roll of tape trying to find the end.

It's been a while since I mentioned a site I love -- PaperBackSwap.  Do you have books you've read and/or books you don't want anymore? Swap them for ones you do want for free! It's awesome -- for more info about it you can read my post all about it here. You can print wrappers off the site, but they don't always fit the dimensions of the books I'm sending. After a while, I just started buying special shipping envelopes for all the books I mailed. Not anymore!  Now I just wrap them in paper grocery bags (whenever I forget my reusable bags, I always opt for paper).  They work so well since the paper is fairly heavy and durable. In fact, I got a message from the recipient of the book pictured above telling me how well packaged the book was!

Plus, who doesn't like getting a "brown paper package" in the mail, especially if it is a free book?

Are you a crazy person like me who washes and reuses plastic zipper bags?  I don't do it all the time (I don't reuse bags that have held meat or other wet/sticky/gooey substances), but if I've stored dry items in them, like pancakes, waffles, bread, etc., I always rinse them out and reuse them. And since I haven't used paper towels in years, I use my old paper towel rack as my plastic bag drying rack. Hey, I'm not the only one who has a space devoted to drying plastic bags, so I can't be that weird.

Maybe you've seen this reuse on Pinterest, too. Who knew that the lids from grated Parmesan cheese fit perfectly on Mason jars? In the picture above, I've created a cinnamon-sugar shaker with it. Next lid I have is going on a jar filled with baking soda to use for cleaning. I love this reuse!

For the last few weeks, I've been collecting our empty milk and vinegar (we go through a lot of vinegar in our house) jugs in the shed for -- get this -- making miniature greenhouses. Apparently, you can use empty gallon-sized jugs to house seedlings in the late winter and early spring months. I've always shied away from starting seeds because of the need for special lighting and seed-starting kits. I don't have the room in my house for that kind of operation! With these miniature greenhouses, you can keep your seedlings outside even when the temperatures are freezing. AMAZING! I haven't done any winter-sowing yet, but I'm going to start next month by planting tons of tomato seeds. If this works (and the author of the post about it swears it does), it will save me a lot of money. It's bordering on silly how excited I am about this.

Then again, I always get a little too excited about a good Random Reuse...

Note: I have not received any compensation for writing this post. I have no material connection to the brands, products, or services that I have disclosed.

Saturday, March 17, 2012

Our New Chickens and Our Homemade Brooder

It's been an interesting week at our house.

I honestly can't believe we're actually doing it -- we've got chickens! Having our own little flock of backyard chickens is something I've wanted to try for a few years now, but I didn't think it'd ever happen. At times I feel all excited about this new endeavor, but then I'll occasionally get this "I hope I know what I'm doing" feeling. I've been reading a lot and talking to people about it. My husband's family had chickens when he was growing up, so he knows what to expect. I feel prepared, but there's something about actually bringing the chicks home that's a little intimidating. So far, though, it's going all right.


I picked up our girls at the local feed store for three bucks each. They're not day-old chicks -- they've got to be at least a week or two old. We got a Rhode Island Red (my five-year-old gave her the best chicken name ever: Princess Leia. Get it? Lay-a. Awesome.), a Black sex-link (we named her Foxy Cleopatra), and an Ameracauna (we gave her a good America-inspired name: Betsy Ross. What's cool is that she'll lay green eggs someday!).  We've had fun watching these little chickies, holding them, and hearing their little peeps from the storage/water-heater closet. My oldest son's favorite thing to do is feed the chicks worms from the garden and watch them run around, peeping wildly, and playing tug-of-war with the poor worm. My baby just giggles as he watches them and says a word that sounds a lot like "chicken" over and over. Yes, we've already started to love "chicken TV".

When we brought the chickens home, I put them in the cat carrier (the one we use once every couple years when we take our semi-feral 25-lbs. cat to the vet for shots) with the heating lamp resting on top.  I knew we needed a bigger space for them for the next few weeks so we set out to make a "cheep" (ha ha) chick brooder.

You can buy chicken brooders from hatchery catalogues, but I think it's unnecessary if you're just raising a few for your backyard. From one post I read, you can use just about anything for a chicken brooder:  a cardboard box, a plastic storage container, a kiddie pool, an aquarium. Basically, you just need a place to keep them contained. Our homemade brooder isn't fancy by any stretch of the imagination, but it is working well for us!


We went with plastic storage container route with our brooder. Since we have a curious almost-one-year-old boy and the aforementioned 25-lb. cat, we decided to put a lid on our brooder. You don't need to have a lid as long as the box is 12 inches deep.

For our brooder, we cut out the center of the lid. The edges were pretty jagged and rough, so my husband got out the roll of duct tape and covered the edges with it. Once that was finished, he covered the hole with some mesh window screen material (we just picked up a roll of it at Walmart when we got the storage container). Then he secured the mesh material in place by drilling some small screws along the edges. I like this container and lid in particular because it has the handles that latch on the ends making it even more baby and cat-proof. Like I said before, our homemade brooder is nothing fancy, but it does the job.

Add the heating lamp (we have ours strung from from some rope from a shelf over the brooder), the chick feeder and waterer, and some pine shavings, and you're done. In the end, setting up our chicks' living space for the next few weeks cost around $20. For more information about setting up a chick brooder, check out  this article. Also, the "Raising Chicks" chapter in Ashley English's Keeping Chickens is very helpful.

And so our backyard chicken endeavor begins.

Note: Some of the links in the post above are "affiliate links." This means if you click on the link and purchase the item, I will receive an affiliate commission. Regardless, I only recommend products or services I use personally and believe will add value to my readers. 

Friday, March 9, 2012

Book Report: What I've Been Reading


I read a saying once that describes me perfectly: I buy books like other women buy shoes. Seriously. You can usually find me in the middle of two or three books at a time. I was looking through this blog's archives not too long ago (I can't believe this blog is 2 1/2 years old already!) and I came across this book report post. I thought I'd do another post like it and share what I've been reading lately (at least the books that have something to do with this blog. Incidentally, the novel I'm reading right now is The Forgotten Garden by Kate Morton). It's a pretty good snapshot of where I am with my frugal and homemaking goals.

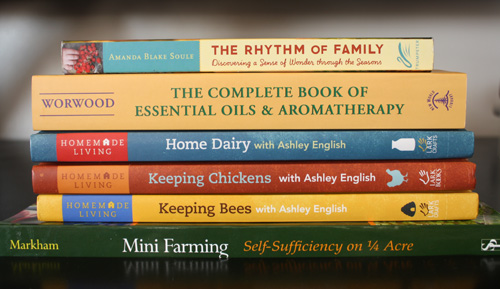
The Rhythm of Family by Amanda Blake Soule
I just love SouleMama's blog.  It's one of my favorites. She inspires me to live more slowly, to pay attention to the goings-on around me, and to live closer to the earth. She has also inspired me to learn to sew and knit, among other things. Anyway, I got her book a few months ago and I just had to mention it again (I say again since I mentioned it before here, here, and here). There are a lot of great projects, ideas, and recipes. It is broken up into months -- each month features an essay from her, an essay from her husband, and some projects/crafts/recipes to go along with that particular month. It's just lovely. You should check it out.

The Complete Book of Essential Oils & Aromatherapy by Valerie Ann Worwood
I'm not really reading this book straight through since it's more of a reference guide, but what I have read is really interesting. I've been intrigued for some time about essential oils. I use them here and there for a few things (mostly in cleaning solutions or a few drops of lavender oil in the bathtub), but I definitely don't know much about them. This book was recommended by a friend whose hippie/naturopathic guru aunt (I think it was her aunt...) said it was the best guide out there. Right now, I'm reading the introductory chapters and slowly accumulating the oils she recommends having on hand. (Question for essential oil users: What brand is your favorite?)

The Homemade Living Series by Ashley English :: Keeping Bees; Keeping Chickens; and Home Dairy
I took a beekeeping class about a month ago (we're keeping the hives at my parents' house. Our hives arrive at the end of this month and six pounds of bees in April!). My husband has agreed (admittedly, somewhat reluctantly) to getting two or three chickens either this spring or next year. I even made butter last night (yum.). I've been having a lot of fun with Ashley English's Homemade Living books. These books are awesome. They are comprehensive without being overwhelming. The layout is fantastic and the photography is beautiful. The beekeeping book coincides so well with what I learned from the class. I feel well-prepared for raising chickens in my backyard. Even making my own butter, sour cream, cheese, and yogurt seems doable. Her guides are empowering and fun. I can't recommend these books enough.

Mini-Farming: Self-Sufficiency on 1/4 Acre by Brett L. Markham
Can you tell that I'm on this homesteading kick? I just think the whole movement (seriously, it seems like one) toward self-sufficiency and keeping food as close to home as possible is so cool. I love how so many people are wanting to take a more active role in the food they and their families eat. Anyway, I picked up this book a month or so ago. I finally got to it about a week ago so I'm only a few chapters into this book, but it's completely fascinating. The authors shows, step-by-step, how you can actually provide up to 80% of a family's food needs on only a 1/4 acre lot. I'll write more about it once I've finished it and have started implementing some of his techniques in my own yard. We'll see how it works. Heaven knows, my last couple gardening seasons have been pretty disappointing -- hopefully, this book will help.

What are you reading right now?

Note: Some of the links in the post above are "affiliate links." This means if you click on the link and purchase the item, I will receive an affiliate commission. Regardless, I only recommend products or services I use personally and believe will add value to my readers. 

Monday, March 5, 2012

Sudsy Savings: Two Homemade Hand Soaps

I'm going to risk sounding a little odd: I get pretty excited over homemade cleaning concoctions. Some vinegar here, some baking soda there, a few drops of essential oils, maybe even some castile soap, and I'm in a state of nerdy, frugal-girl nirvana! Homemade cleaners are a great and easy way to be thrifty. Store-bought cleaners, whether they're for your home or for your body, often contain questionable (even toxic) ingredients and so many of them are watered down. Plus, there's something just so satisfying about making them yourself. Really.


So today's post is all about homemade hand soap. I wish I would have found these two homemade solutions years ago. They're both so easy and they are big money-savers.

Solution #1
I wrote a post about how to make homemade foaming soap last August (a few months after first reading about homemade foaming soap from the blog, Live Renewed). I'm only mentioning it again because my post on it has been pretty popular on Pinterest this past week. But with good reason -- homemade foaming soap is beyond simple to make and it's so economical.


It's almost silly how easy it is to make this stuff. All you need is a foaming soap dispenser (I just reused the one we had once it was empty), liquid castile soap (I like all of Dr. Bronner's soaps -- the one pictured above is almond scented), and water.

Fill the dispenser almost all the way with water then add 1 tablespoon (you may need more or less than that) castile soap. I don't even measure anymore, though. I just fill it mostly up, eyeball the amount of soap I put in, and then I test it out. If it doesn't spread well on my hands, more soap needs to be added; if it takes a while to rinse off and it feels too slippery, I'll add more water. That's it. It literally costs just a few cents to make a bottle of foaming hand soap. To think I used to spend $3-5 for a single bottle of the Method foaming soap...yikes.

Solution #2
This next solution is something I've been wanting to share with you all for a while. Again, it made me more excited than it probably should have. But here it is: how to make your own liquid hand soap.


I saw the tutorial on how to make liquid hand soap from a bar of soap on Pinterest a few months ago and I was instantly interested. I clicked over to the blog post, looked through all the steps, and I had to give it a try. I mean, with one bar of soap, a little bit of glycerin, and some water, you can make a gallon of hand soap! A gallon!

I won't give you the in-depth step-by-step here -- the blog where I got the tutorial does a great job explaining it.  Basically, you grate up a bar of soap (I used a bar and a half of Dr. Bronner's rose-scented bar soap since the bars are smaller. Smells sooo good.), add the soap to a pot with a gallon of water in it, add a couple tablespoons of liquid glycerin (I bought my bottle of it at Walmart for like a couple bucks. It's just over by the bandages and hydrogen peroxide.), and cook it until the soap dissolves. That only takes a few minutes. Then you just leave it alone for 10-12 hours.


After the 10-12 hours, the mixture gets all thick and hard like liquid hand soap. I had to add a little extra water and give it a good stir with the hand-held electric mixer. Once the consistency is slimy and gooey (she actually said it takes on the consistency of snot. It's gross, but true.), it's ready to use.


Just like the tutorial illustrated, I put all of my liquid soap in a washed-out milk jug and labeled it. That's it. For just a few minutes of actual hands-on time, I got a gallon of quality hand soap for around five bucks!

Make these. Try to tell me you don't feel a hint of self-satisfaction when you're done. Pretty soon, you'll be feeling a little giddy over homemade concoctions, too.

Note: Some of the links in the post above are "affiliate links." This means if you click on the link and purchase the item, I will receive an affiliate commission. Regardless, I only recommend products or services I use personally and believe will add value to my readers. 

Thursday, March 1, 2012

For the Kids: Homemade Snow Dough

Spring can't come soon enough. I'm no winter-hater by any means, but we're all getting that stir-crazy, cabin fever feeling at our house. To help combat that antsy feeling,  I've been on the lookout for good ideas for indoor play to keep us distracted. Yesterday, I came across this idea for snow play dough on Pinterest.


It's really simple -- snow dough is just regular homemade play dough sans food coloring. About a year and a half ago, I did a post about the best homemade play dough recipes. For this batch, I followed recipe #1 from that post (minus the coloring), which goes as follows:

In a medium saucepan combine:
1 cup flour
1/2 cup salt
2 tsp. cream of tartar
Then add:
1 cup water
5-6 tsp. vegetable oil
Cook over medium heat and stir constantly until mixture forms into a ball. It will appear lumpy but keep stirring. After it forms a ball, turn out on counter and knead until cool. Store at room temperature in airtight container or bag.

The blog I got this idea from suggested adding glitter to the mix to make it more like sparkly snow. I didn't have any glitter on hand, so we skipped that. The site suggested making snowmen, snowballs, and other similar creations. My five-year-old decided to re-enact the battle of Hoth from The Empire Strikes Back.


It's such a simple activity but still a lot of fun. Leaving out the food coloring creates a whole new aspect to play dough. Who knew?  I love it.


And so does my little Star Wars enthusiast.
Related Posts with Thumbnails