Showing posts with label Health and Hygiene. Show all posts

Friday, January 30, 2015

Lovely Links: "I Survived My Whole30!" Edition

First of all, Happy New Year!

Secondly, I'm on the last day of my Whole30!

(source: instagram.com/whole30)

After indulging this past holiday season (read: cookies for breakfast! Eat all the chocolate!), I decided a Whole30 was in order and started on January 1. For those of you not familiar with the Whole30 program, it's basically a dietary reset. For 30 days, you eliminate grains, dairy, sugar (white sugar, honey, syrup, any added sugar), legumes, and alcohol (that last one was the easiest part for me, Mormon girl that I am, haha!).

What was awesome this time around (this is my second Whole30 -- I did one this past September, in preparation for my family's trip to Hawaii) was that my husband did it, too. Let me tell you, having someone else doing it with you makes it so much easier, even if that other person doesn't think it's all that hard to follow. As I grumbled over zoodles (basically, cutting zucchini into noodles), he was like, "You know, I think I prefer these over pasta!" Grrr.

So, yeah, Day 30 is here. I survived! It was definitely hard at times, but after a couple weeks the sugar cravings subside and you get used to the program. There were definite ups and downs, times when I felt angry and deprived (I found myself sniffing chocolate cupcakes that a neighbor gave us at one point. Seriously.), but more than that, I feel good. It feels good to not have sugar highs and lows. It feels good to eat nothing but whole foods. It makes things taste better. Take fruit, for instance. Once I was off refined and added sugars, eating a strawberry tasted like candy!

Oddly enough, I haven't lost much weight this month like I did in my first Whole30 (I lost 12 pounds in a month that first time!), but I do have more energy, feel less bloated, my skin looks better, and the whites of my eyes are even whiter (and oddly enough, I swear my eyelashes got longer). My husband has noticed a few benefits, too. The main one for him was that his gastrointestinal issues (he doesn't have a gallbladder so it can sometimes cause some GI troubles for him) got dramatically better. It's been cool to do the program with him, because in the past he's not really cared that much about health and nutrition (he let me do all that stuff since I'm in charge of the grocery shopping and meal prep). Now, that's he's done the program, he understands better the value of it all. He was checking the labels on things more even more than I was (I was bummed when he noticed that the Trader Joe's sriracha sauce had sugar in it. Womp womp.).

The biggest pay-off, though, is the satisfaction in knowing that I did it, that I stayed strong and focused.  I definitely have a clearer idea of how I want to eat from now on, too. I'm glad we did it -- it's certainly been a learning experience for my husband and me.

So for this edition of Lovely Links, I thought I'd share what helped me through my Whole30, just in case you ever decide to do one. I highly recommend giving it a try -- these resources will definitely help.

BOOKS

It Starts With Food: Discover the Whole30 and Change Your Life in Unexpected Ways by Dallas & Melissa Hartwig  -- This is a must-read if you're going to do a Whole30. All the science behind it (written in a totally readable, uncomplicated way) and the why and how.  Really, it's a good read, whether you're going to do a Whole30 or not.

Nom Nom Paleo: Food For Humans by Michelle Tam and Henry Fong -- I love this cookbook SO MUCH. It's seriously one of my favorite cookbooks, period. Everything I've made from it has been so delicious. A few favorites that helped me and my husband with our Whole30 (and my previous Whole30): madras chicken salad, chicken nuggets (no breading and they're awesome!), kai jiao (Thai omelet - so tasty!), curried cream of broccoli soup, uova in purgatorio, and bacon-topped deviled eggs (they've become a regular thing my husband makes -- yum). Her recipes for paleo ranch, Louisiana remoulade, and paleo mayo are delicious and so simple to make, too. You should have this cookbook, no matter what kind of diet you follow. It's that good. (Looking forward to making the walnut prawns recipe next week -- couldn't make it during the Whole30 because it has honey in it. Holy moly, the walnut prawns recipe is sooo good.)

Make It Paleo: Over 200 Grain-Free Recipes for Any Occasion by Bill Staley and Hayley Mason -- This is a good resource for easy paleo recipes -- lots of good basics here. I like the recipes for salad dressings and prepping vegetables as side dishes. One great thing about this book when it comes to the Whole30 is that it has lots of breakfast recipes (a good thing for me since breakfast is the hardest for me to give up. I love my pancakes and waffles. And French toast. And oatmeal. And cold cereal.). Side note: it's worth mentioning that the chocolate chip cookie recipe in this book is surprisingly delicious -- and very NOT Whole30.

Well Fed 2: More Paleo Recipes for People Who Love to Eat by Melissa Joulwan -- I kept seeing this book on all sorts of posts about doing a Whole30, so I picked up a copy. This book is a great resource because it complements It Starts with Food really well and almost all the recipes are Whole30 compliant. There are many great ideas on how to keep your menu full of variety by making your own sauces, dressings, condiments, burgers, and sausages. I really liked the Taj Mahal chicken recipe. This book also got me to try plantains (which truly is something for someone who has had a lifelong aversion to bananas. Still do.) -- I totally recommend Trader Joe's plantain chips now.

INSTAGRAM

I love Instagram -- it has pretty much replaced Facebook for me. Instagram has been a great resource during my Whole30, too. Here are a few accounts that I follow:

@Whole30 -- the official Instagram account for the Whole30 program. It's been so helpful to have it give daily inspiration and information, like "on this day, you're probably feeling ____" or  answering frequently asked questions. I also like getting direct info and answers in the comment section from Melissa Hartwig, the creator of the program.

@Whole30Recipes -- Exactly what the name implies, just a lot of Whole30 recipes. It's hit and miss for me -- sometimes the recipes look absolutely delicious, other times not so much. Every week there is a new contributor that posts recipes and it's been a great way to find people to follow.

@nomnompaleo -- Michelle posted posted daily throughout the Whole30, a new recipe for each day. Lots of the recipes were from her cookbook, but there were new ones, too. Plus, she's just funny.

@Amazon_Ashley -- Her Instagram feed is great. Lots of delicious recipes and encouragement. I really love how real she is. Still need to try her sweet potato bun recipe. I bought her ebook when it was on sale -- it's called Clean & Colorful Cooking and it has some really simple recipes in it. I haven't made any yet, but I'm excited to. (Tip: be sure to have the underscore in her name or else you get redirected to a different, much more adult account. Yikes.)

@littlecoconutty -- This is such a beautiful feed (she's a graphic designer, so it makes sense). Recipes and encouragement to be found.

@pretend_its_a_donut -- Just discovered this one this week, looks fun. And I really like her account name.

OTHER HELPFUL LINKS

Dreading Your Whole30? Just start it now (with 9 planning tips) -- Modern Mrs. Darcy
I read this post last year before I did my first Whole30 and it inspired me to take the plunge. PS -- this is one of my favorite blogs, mostly for book-related reasons.

The Round-Up: 30 Days of Whole30 Recipes -- Nom Nom Paleo
Yep, I'm mentioning Nom Nom Paleo again. (I think I may be becoming a NNP fangirl.) But her blog is a really great resource, too.

Spicy Shredded Pork -- The Pioneer Woman
I made this pork shoulder recipe at least twice (maybe three times?) during this month's Whole30. You can find the recipe in her first cookbook, too. I omitted the brown sugar and it was still good. This recipe is great because you can cook up a pork shoulder (I do it in my slow cooker) and then use leftovers in recipes all week -- I particularly like making a salad with it, with a dollop of salsa and guacamole.

Paleo Egg & Chorizo Muffins - Sweet C's Designs
One thing that got tiring for me with the Whole30 is that there is a lot of meal prep, which can be inconvenient if you're in a hurry. These egg muffins (I used loose sausage instead of chorizo) are super-simple to make and you can freeze them. When you want a muffin, you can just reheat it in the microwave or oven.

Pizza Stir Fry Recipe -- Wellness Mama
Friday nights are pizza + movie night at our house, which is a problem when you're doing a Whole30. I will say that this recipe doesn't come close to the deliciousness that is pizza (not that the recipe is bad or anything, but I just really, really, really love pizza), but it definitely helped on Friday nights, even though I still shot more than a few wistful glances at the pizza my boys were eating. Sigh.

The Whole30 Timeline -- Whole30.com
"Day 1: What's the big deal?
Days 2-3: The hangover
Days 4-5: Kill all the things.
Days 6-7: I just want a nap."  This timeline walks you through the ups and downs of the program. I'll be honest, the first Whole30 I did was an emotional roller-coaster for me and I felt those ups and downs hard. This time wasn't so bad, especially since I had my awesome husband along for support. But I still referenced this a lot to keep me focused and to know what to expect -- and I thought it was kind of funny, too.

So, yeah, I made it through my Whole30. It was hard, but not the hardest thing I've ever done. And you know,  I'm going to keep following it pretty closely. I feel that good. That said, tomorrow is my mom's birthday and I'm totally having a (smallish) piece of her birthday cake. What's more, I'm going enjoy that cake and I won't feel an ounce of guilt because I actually feel in control. No more sugar dragon ruling my life. And that is the best result of this Whole30 experience.

Note: Some of the links in the post above are "affiliate links." This means if you click on the link and purchase the item, I will receive an affiliate commission. Regardless, I only recommend products or services I use personally and believe will add value to my readers. 

Monday, December 8, 2014

Classic Wet Shaving: The New Old-Fashioned (and eco-friendly) Way to Shave


My husband hated shaving. He avoided it. He looked forward to camping and vacations partly just because it meant he wouldn't have to shave. I think avoiding shaving was a main part of his motivation to grow a beard in the wintertime.

However, I've always liked it better when he's clean-shaven. The smell, the smoothness -- all good things. But then I found out why he disliked shaving so much. The various creams and gels on the market really irritated his skin. The razors tugged on his skin, especially on his neck, and left a bunch of little, red bumps on his lower jaw and neck. He would also get ingrown hairs from time to time. Shaving was uncomfortable and unpleasant, but he did it anyway. I could understand why he didn't like doing it.

But this all changed over four years ago. Now he doesn't mind shaving at all. He even looks forward to it a little because he says it's relaxing.

What changed? He learned about traditional wet shaving. Not only does he greatly prefer it, but it also happens to be a frugal and eco-friendly way to shave. Talk about a win-win-win situation (or would that be four wins because I get a cleanly shaven husband more often...)

Now that the holiday season is in full-swing, I thought I'd write a post about the many benefits of classic wet shaving because new (and better) shaving tools would make a great gift for the guys on your shopping list!

You can read the rest of my post about the health, frugal, and eco-friendly aspects to wet shaving at my monthly post at here.  (You can also find my past posts on the topic of wet shaving in my archives here and here.) 

Friday, May 2, 2014

Lovely Links: Lovely Locks Edition

About six months ago, I chopped close to fifteen inches off my hair.

Since I don't dye my hair and because I'd worn it up so much (being a mom with nearly waist-length hair meant lots of braids, buns, and ponytails), my hair was healthy enough to be donated. I even got a $10 discount for donating (everyone wins!).  I've always had long hair, but I was ready for the change and barely flinched when she chopped that long braid off. 

As the lady was styling my new haircut (which I loved), she was suggesting all sorts of products and tools I would need to style my now shoulder-length hair. Like I said, before the cut, I wore my hair up most the time; I didn't have time to blow-dry or curl all that hair! But once it was chopped off, I was told that I needed a flat iron, curling wand, salt spray, heat protectant, and mousse.

Confession: I was so excited about my stylish new hairdo, I bought all of it.

Granted, I didn't buy the $100 flat-iron the stylist told me I needed and the salt spray was basically free with the discount for I got for donating.  Still, I spent a good bit of cash buying these supplies. I felt a little strange buying all those beauty products. I mean, I'm the girl who has washed her hair with baking soda, cleaned her face with oil, and is using the same solitary eye-shadow compact I bought at least two years ago. 

Since I'm a little paranoid about frying my hair, I go easy with my styling tools, limiting myself to only 2-3 times a week. In the process, I've found a lot of alternate ways to curl my hair. In many ways, I find myself preferring the look of the heat-less curls over the heat-styled ones.

But why am I blogging about my hair on a blog about frugality? Because as I've been thinking about it, curling your hair without heat can actually save some money.

One way that heat-free curling can save you money is that undamaged hair means less trips to the salon. Split ends are often the result of heat damage and the only way to get rid of them, despite what many shampoo commercials say, is to cut them off. Unless you're particularly brave and can cut your own hair or you have a stylist in the family, you'll have to pay to get your damaged hair trimmed. There are lots of in-salon treatments for damaged hair, but the prices for them can range anywhere from $40 to $600 (seriously -- I did a little reading and there are these keratin treatments that can cost that much!). Even if you skip the professionals and try to fix heat-damaged hair at home, it can still get costly. 

Another way heat-less curling can save you money is pretty obvious: you don't need to buy an arsenal of tools and hair products, like curling irons, wands, flat-irons, or heat protectant sprays. For most of the heat-less curling methods out there, your needed supplies are likely things you already have at home and if you don't have them, they don't cost much. Usually, you just need a couple socks, some bobby pins, or a headband to curl your hair.

Here are a few of the many ways you can curl your hair without heat, often while you're sleeping:

This was one of the very first tutorials I pinned on my hairstyle board on Pinterest and one of the first I actually tried out. When I had all my hair wrapped up, it looked like some kind of weird hairstyle Princess Leia would have, but I went to sleep on it and hoped for the best. It totally worked! I got lots of compliments on it the next day, so, of course, I explained how to do it to a bunch of people. My friend has a darling little girl with super-fine, super blonde hair and she tells me this method is the only way her daughter's hair will hold a curl. My sister-in-law, Katherine, also swears by it and always has great results. I love this curling method for vacations -- it's so easy to just pack a headband! (The link at the top is where I first saw the idea and she has a video there (but it's kind of long). This pin has a quick and simple overview of how to do it; I would've put a link to that but I couldn't find the original source.)

Natural Waves :: Join the Mood
I like this tutorial because it doesn't have to set overnight to work. Plus, sometimes I'd rather have some soft, natural waves instead of curls. This method only requires some water and bobby pins.

Foam Curls :: The Shine Project
Of course, no post about heat-free curling would be complete without mentioning foam curlers. If you're like me, you have childhood memories of wearing pink foam curlers to bed at night (ouch) and waking up with Shirley Temple-esque curls. Even though foam curlers haven't changed at all since I wore them in the 1980s, there are ways you can use them stylishly in the 21st century. The link above is proof. 

{source}
Beach-hair waves are in right now and the whole goal is to look all windswept like you've been to the beach. I find it funny that often a lot of work is required to curl and style your hair so it looks like you didn't do it. In any case, this tutorial looks pretty simple and I'm totally going to give it a try.

71 Toes
This curling method looks really, really easy and only requires 3-4 socks to do it.  I hope my hair is long enough to make it work because I really want to try it this weekend. I love doing my hair Saturday night instead of when I'm trying to get my boys ready for church on Sunday.

Refinery 29
Empty coke cans, pink foam rollers, hand-ripped rags -- this post shows you how to use all them (though not all once) to get gorgeous hair. Seriously, each hairdo is gorgeous. Who needs a blow dryer or curling iron anyway?

Hope your weekend (and your hair) is lovely this weekend! 

Note: I have not received any compensation for writing this post. I have no material connection to the brands, products, or services that I have disclosed.

Thursday, March 20, 2014

How to Make an Essential Oil Reed Diffuser

A couple fairly new developments, resulting from Christmas gifts I got a couple months ago:


One -- I'm kinda sorta falling in love with essential oils. I mean, I've dabbled in essential oils for the last couple years, but this past Christmas my mother-in-law gave us the Family Physican Kit from doTERRA and it's AMAZING. I've used every oil in that kit (except for oregano - I'm a little scared of that one.) and love them. Even my skeptical husband has become a bit of a believer. Balance (the oil pictured above) isn't in the kit but I love it (and I used it for the project I'm going to describe). Though I'm still an essential oil novice, I'm really impressed by how much punch these oils pack and the many, many ways they can be used.


Two -- For the first time in my life, I'm in possession of a bottle of vodka. My brother and his wife gave it to me for Christmas and everyone had a good a laugh about it when they gave it to me. Why? I'm a life-long Mormon and I've never so much as tasted a drop of the stuff, let alone owned a whole bottle. (It was a big deal for me when I bought my first can of beer at age 30 -- to kill snails, of course.) It's actually a really thoughtful gift because my brother remembered me mentioning that I wanted to try making my own vanilla extract and to do that you need vodka. Seeing as I don't frequent the liquor store and all, I've never gotten around to buying a bottle of it. So, for the last few months, I've had it up in my cupboard, next to all the jars of homemade jam and salsa.

So besides the fact that the essential oil and the vodka were Christmas gifts, what do they have in common? They're two of the things needed to make an essential oil reed diffuser.  

I first came in contact with reed diffusers about eight years ago when I was working at Pier 1 Imports. I mostly waddled around the place because I was pregnant with my oldest at the time and just working to fill some hours since I'd quit my full-time job at Barnes & Noble. Granted, the diffusers weren't always so pleasant with the pregnancy-induced superhuman sense of smell I had, but I thought they were cool. Instead of spraying chemicals into the air or using those scenty disks you plug into the wall, the scent of the oil emanated from these skinny sticks that you dipped in them. Who knew?

A few months ago, I noticed that my doctor's office had an essential oil diffuser that was pluged into the wall and I wanted one -- I loved the way it made the room smell! Turns out, the diffuser he had in his office costs over $100. I'd love to have one still and there are all sorts of benefits to diffusing essential oils into the air, but that's pretty expensive. Then I got to thinking about the reed diffusers from my days at Pier 1.

Of course I consulted Pinterest and found out you can make your own diffusers with essential oils. There are a bunch of different methods and ingredients people use. One big difference I found: some use alcohol and some use a carrier oil (like almond or safflower). I opted for the alcohol version because I happened to have some on hand and I like that if this diffuser gets spilled (or knocked over by a kid or cat), it won't leave a big oil stain behind.


After some reading and experimentation, I've found the recipe I like and I'm going to share it with you today!

To make your essential oil reed diffuser, you'll need:


  • a small glass jar or vase; the smaller the opening, the better
  • 1/4 cup water
  • 2-3 Tablespoons vodka
  • essential oil 
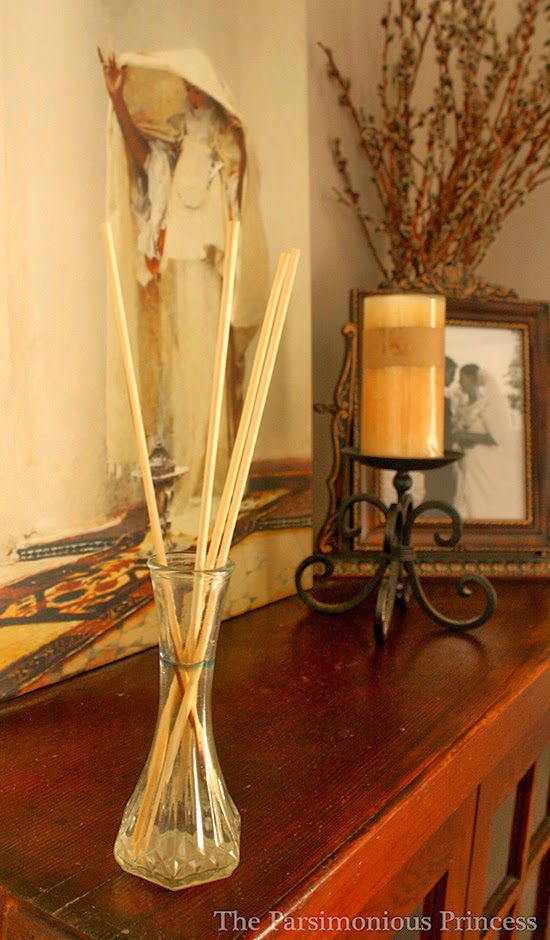
  • bamboo skewers (how many you use depends on how many fit in your jar)

I scrounged around my house trying to find a container that would work well. It can be as fancy or plain as you like. I was planning on just reusing something from my collection of saved jars. I couldn't decide between a spice container from Ikea, a bottle from some yummy organic cream, and an old baby food jar (I don't know where that came from, to be honest), but then I remembered a little vase my mom gave me last summer. Though all the others would have worked all right, I liked the vase because it had the smallest opening; the smaller opening keeps the liquid from evaporating as fast.


Fill your jar/vase with the 1/4 cup water. 


Next, add the vodka. The purpose of the vodka is to help emulsify the water and essential oil. I started with two tablespoons but ended up adding a little more when I saw that the oils were still separating from the water.  (Photo credit: my seven-year-old actually used my DSLR and took this photo for me. I was pretty surprised that he got a clear picture!)


Add the essential oils. I started with 10 drops and then gradually added more until the scent was as a strong as I liked. 


Stick the bamboo skewers in the jar/vase and you're done. I read that some people think that you should opt for the actual reed sticks for your diffuser (and I think they're pretty inexpensive) because they work better, but the bamboo skewers work, too. It's what I had on hand so I went with them. So far, so good. Every few days or so, flip the diffusers to refresh the scent.

After I made mine, I was feeling pretty proud and I put it in a corner of my kitchen. Not the best idea -- the scent that is put out by this diffuser is subtle and seemed to be pretty easily overwhelmed by the various other aromas and smells that come out of the kitchen. So I moved it to my living room (it seemed like a good spot by that painting, in particular). I could smell it a little but not as much as I'd liked. I was totally bummed -- had my experiment totally failed?

Still not willing to accept defeat, I took it up to my room, thinking a smaller and more enclosed space would be better. Sure enough, that was the ticket. I put it on my dresser and gives off a nice, subtle smell. I'm sure if you used a bigger vase/jar, doubled the recipe, and used more skewers (or actual diffuser reeds), you could use this homemade diffuser in a bigger room. But to use what is pictured here, I suggest keeping it in a smaller, more enclosed room -- like a bedroom or bathroom.

Skip the chemical (and toxic) air-fresheners that don't really smell like anything anyway. Try out this simple air-freshener to give your home a pleasant and aromatic lift.

Note: Some of the links in the post above are "affiliate links." This means if you click on the link and purchase the item, I will receive an affiliate commission. Regardless, I only recommend products or services I use personally and believe will add value to my readers. 

{This post is linked up to The Homestead Barn Hop.}

Wednesday, January 8, 2014

The Green Juice Recipe My Entire Family Loves (Yes, Loves)

Here we are in January yet again. Clean starts. New goals and resolutions. Here are my three for 2014:
  1. Finish Baby Step #3.
  2. Read more books.
  3. Eat more vegetables.
Granted, I've got a bunch of other little goals and ideas, but these are my main three for the year. I figure a lot of those aforementioned "little goals and ideas" of mine fit somewhere in those three goals.You can be sure that there will be posts on here about my progress on each of them.

These goals also happen to branch out to my aspirations for my family. Take the whole vegetable thing. I'm just as concerned about getting more vegetables into my boys' little bodies as I am mine, if not more so. These boys of mine are growing like crazy and they need all those vitamins! One way I've been getting more vegetables, particularly of the green variety, into everyone in my family (including the husband) is with our juicer. 

Years ago, my parents gave us (and each of my brothers) a juicer for Christmas. My parents had just gotten into juicing months before and wanted us to benefit like they had. They got us a Jack LaLanne juicer from Costco. It was something I probably wouldn't have bought for myself, but we ended up being so glad we got it. One reason: it got more vegetables and fruit into our diets, including then three-year-old Max. Max has never been a picky eater and loves fruits and veggies (I used to bribe him to be good at the store when he was four with promises of Caesar salad). Jonah, however, is definitely the pickier eater of my two kids and getting a balanced diet into him is much harder. Enter: our green juice. 

This green juice mostly consists of vegetables, but it still deliciously sweet and refreshing. I believe I got the original framework for the recipe from Dr. Oz when he was on Oprah. I can remember Oprah tasting it and saying that it tasted like "a glass of fresh" or something like that. Really, that's a perfect way to describe this juice. 

Now I know there is some debate between the benefits of juice vs. smoothies. I love smoothies but have yet to master smoothie making, especially when it comes to green smoothies (mine always turn out looking like brown sludge). Some say that juicing is more healthful, others argue that smoothies are better. There is also the issue of waste -- there's no leftover pulp when you make smoothies. That said, juicing works well for our family. We all love coming up with various concoctions with our juicer, though this green one is our favorite and go-to recipe. 

What does this have to do with frugality? Not only is juicing a great way to get nutrition and stay healthy (an ounce of prevention is worth a pound of cure, after all), but it's a great way to prevent produce waste. Instead of tossing out over-ripe fruit and wilting vegetables, juice it. Produce that might not look too appetizing to eat out of hand or in a salad, works well and tastes fine when it's juiced (as long as nothing is spoiled, of course). I'm pretty sure I'm not the only person who buys produce with great aspirations to eat all of it but then doesn't get around to it. Juicing (same goes for smoothies) is a great way to make sure the produce you buy gets where it needs to go: into our bodies and not into the trash.

So, here's how I get a good portion of these fruits and vegetables...


...into this almost three-year-old's tummy, all before 9 AM. (See how he's still in his Mickey jammies?)


To make our family's favorite green juice (the amounts in the parenthesis will yield about four cups of juice) you'll need the following: 
  • spinach (about 2-3 big handfuls)
  • cucumber (1 medium sized)
  • celery (2-3 ribs, 4 if small. Be sure to include leafy tops.)
  • Italian parsley (about 1/3-1/2 of a bunch)
  • apples (2 medium apples)
  • lime (1/2 of a small one)
  • lemon (1/4 of medium one)
  • ginger (1-inch chunk) {I don't always use this but it does add a nice flavor and helps with digestion.}
This recipe is certainly not one of absolute measurements -- I mostly just eyeball it -- and it can be adjusted to how many servings you need. In the past, I've substituted pears for apples and beet greens and chard for some of the spinach. I also leave the peels on the apples, lemons, and limes. 

Juice according to your juicer's directions. My boys love helping with this part -- it's what got both of them to drink it at a young age. They think it's a lot of fun. Jonah loves to put the ingredients down the chute and Max likes to push the ingredients down with the...what's the word?...pusher-downer thing. Yeah. That's what it's called. *ahem*


Once all the juice has been extracted, give it a good stir. Again, my boys love this part -- when they're both helping make juice, they each have to have a turn with stirring. It's like stirring some kind of potion to them.


And there you have it: our family's favorite green juice. Some people balk at the idea of drinking something green, but it really is so tasty. Any doubter is quickly converted after a sip or two.


My boys seriously guzzle the stuff. Jonah had his finished before I even started mine. 

About the pulp...


One of the big arguments against juicing is the pulp that goes to waste. It's a valid argument -- that is beneficial fiber. It doesn't have to go to waste, though. It can easily be used in recipes. My mom has used the pulp from her homemade carrot juice to make muffins. You can find all sorts of recipes online; this book also has lots and lots recipes using the pulp. I've never really baked or cooked with the pulp, but I still don't waste it. It always either goes to the compost pile (to help grow new vegetables!) or to the chickens (though I take the citrus peels out before I give the pulp to them).  The ladies in the backyard love it when I take the pulp out to them -- I love that it makes for even more nutritious eggs.


After I'd been juicing for a while, I picked up a book that my mom suggested. Along with a bunch of recipes, it also has a section that lists the health benefits for each type of juice. I thought it was interesting so here are some of them: (Note: I'm just sharing what's in the book. Take it for what it's worth and check with your doctor if you have questions. I'm certainly no doctor; I got my degree in English, people.)
  • Spinach juice helps cleanse the kidneys, liver, and digestive tract. Improves regularity. Helps prevent bladder cancer and stomach ulcers. Fights infection. Helps lower high blood pressure and maintain acid-alkaline balance.
  • Cucumber juice cleanses the kidneys. A weight-loss tool. Helps lower high blood pressure. Excellent for skin problems. Excellent daily source of fluid.
  • Celery juice cleanses the kidneys and liver. Useful for weight loss. Helps maintain both acid-alkaline balance in the blood and calcium levels. An excellent mixer with other, stronger juices. Treatment for gout and ulcers. 
  • Parsley juice cleanses the urinary tract and the blood. Treats conditions of the kidneys and liver. Helps prevent many cancers such as kidney, liver, urinary tract. Good for circulatory deficiencies. Good for general heart health. Can be used for weight loss. Good for the eyes.
  • Apple juice is good for healthy skin and hair. High vitamin C content protects against cold and flu. Pectin cleans out toxins and helps maintain regularity. Eases indigestion. Good juice for a weight-loss program. Flushes kidneys and liver.
  • Lime juice is good for colds and flu, indigestion, and skin problems, liver problems, constipation, anemia and other blood problems.
  • Lemon juice is good for treating minor bruises, for pregnant women, as a tool for weight loss, and to prevent colds and flu.
  • Ginger helps relieve upset stomach and aid digestion.
If you have a juicer and it's collecting dust in your pantry or cupboard, get it out and give this recipe a shot. Your body will thank you. Quite a refreshing way to start the year.

Note: Some of the links in the post above are "affiliate links." This means if you click on the link and purchase the item, I will receive an affiliate commission. Regardless, I only recommend products or services I use personally and believe will add value to my readers. 

Tuesday, November 13, 2012

18 Ways I Use Vinegar at My House

My husband teases me whenever we go grocery shopping because I usually buy more gallons of vinegar than gallons of milk.  I tell him that someday, when the zombie apocalypse finally happens, we will be the envy of the neighborhood because of our stockpile of vinegar. It'll be a hot commodity, I tell you (we'll have to guard our stash with a double-barrel shotgun), because it's useful in so many ways.

Here a few of the ways I use vinegar at my house...

1. All-purpose cleaner.  This is the #1 reason I think that vinegar is a great thing to have on hand (zombie apocalypse or no):  vinegar (straight 5% solution -- the kind sold at supermarkets) kills 99% percent of bacteria, 82% of mold, and 80% of viruses. Because of this, I use vinegar to clean just about everything in my house. To make an all-purpose cleaner,  mix equal parts white vinegar vinegar and water in a clean spray bottle. That's it (though sometimes I add a few drops of orange, lemon, or tea tree essential oil). I use this cleaner in my kitchen, bathrooms, everywhere. Best of all, this all-purpose cleaner is way cheaper than a store-bought all-purpose cleaner. I also love it because it's just vinegar -- no funky chemicals to worry about. (One word of warning -- don't use vinegar on marble or granite surfaces.) Your home won't smell like vinegar once it dries, I promise.

2. Dishwasher rinse aid. Fill up the rinse aid dispenser in your dishwasher with straight white vinegar instead. Totally works for me, even with my hard water.

3. Garbage disposal cleaner.  A great way to combat stinky kitchen drains is to freeze white vinegar in an ice cube tray. Once frozen, pop a few vinegar cubes into the disposal and turn it on. It not only gets rid of the stink but it also helps sharpen the blades of the garbage disposal, too.

4. Stain remover. I use vinegar in the laundry room a lot, especially since white vinegar works well for getting rid of stains.  I think it works particularly well with food stains. Here's a link to the stain fighting chart I have in my laundry room, courtesy of Martha Stewart.


5. Fabric softener.  Did you know that vinegar is a natural fabric softener? I pour around 1/4 - 1/2 cup of white vinegar into the middle of the agitator (that's where my machine's fabric softener dispenser is) and it gets released into the rinse cycle.   The vinegar keeps our clothes static free when I use the dryer - I haven't purchased dryer sheets in over two years. Vinegar is also helpful for the clothes that I dry outside on the clothesline -- it makes them less stiff.  And don't worry about your clothes smelling like vinegar -- once they're dry, the vinegar smell disappears.

6. Eliminating boy bathroom smell. I grew up with three younger brothers. I have a six-year-old boy now. I am well acquainted with "boy bathroom smell". (Is it really that hard to aim? Really?) What's the best way to clean the floor around the toilet? With vinegar! Not only does it neutralize the smell and kill germs, but it's also a safer way to clean. Mixing bleach with anything with ammonia in it (read: urine) can create a dangerous toxic gas. True story. Anyway, I splash vinegar around the base, let it soak for a while, then mop it up.

7. Toilet bowl cleaner. I've been cleaning the toilets in my house with only vinegar for years. When I clean a bathroom, the first thing I do is flush the toilet, add about a cup of vinegar while the bowl is refilling with water, and close the lid. I clean the rest of the bathroom (with spray bottle filled with vinegar) while I let the vinegar in the toilet do its work. Once I've finished cleaning everything in the bathroom, I'll scrub out the bowl with the toilet brush and all stains come right off. Flush and the dirty work is done.

8. Cleaning up vomit. I've mostly have experience with this from my (recently departed...sniff) cat. Let's just say he had a sensitive system and grazed on grass as if he were half-cow. Anyway, vinegar is good for cleaning up vomit because it has a more neutral acidity level than stomach acid, which helps neutralize that horrible vomit smell. I usually attack those stinky spots with a mixture of water and white vinegar (about a 2:1 ratio) and the smell goes away pretty quickly.

9. Glass cleaner. I'm a big fan of the "Alvin Corn" glass cleaner recipe I found on Pinterest. To make it, you only need vinegar, rubbing alcohol, cornstarch, and water. It's inexpensive and it works really well.


10. Pickling. I used so much vinegar canning this fall. Pickled peppers, dill pickles, sweet pickles -- delish.  You certainly can't pickle without vinegar.

11. Salad dressing. Vinegar goes great with salad. I like splashing some red wine vinegar or balsamic vinegar straight onto my salad and eating that way. You can also make your own Italian dressing with vinegar -- for the super-easy recipe, go here.

12. Coleslaw. My husband served an LDS mission in the southern United States. After spending two years in the South, he come home with a love for slaw (especially when it is piled up on a hot dog with some chili. I thought it was weird until I tried it. YUM.). Lucky for him, I've been making it pretty often since I discovered Paula Deen's recipe (so easy, so good!). Without vinegar, coleslaw is just cabbage and carrots; vinegar is what makes it work.

13. Turning milk to buttermilk. Real, cultured buttermilk is always best in recipes, but sometimes I don't have it on hand. In those instances, I make do by mixing a little bit of vinegar with milk. To make a subsitute for 1 cup of buttermilk, mix 1 Tbsp. of vinegar with a cup of milk. Let it stand for about 10 minutes -- this will give it time to curdle the milk and thicken. Only use this method if you'll be cooking or baking -- it's not meant for recipes where you would use buttermilk raw, like in a salad dressing.


14.  Health drink. Drinking a couple teaspoons of apple cider vinegar mixed with water a few times a day is supposed to be really good for you. My husband used to drink it every day when he was in high school and said it helped him with colds and such. I've been trying to drink it regularly, but the stuff is strong. I'm trying to get used to it. I'll let you know if any of those health benefits start kicking in. I've also mixed a little bit of ACV with my chickens' water because it's supposed to be beneficial for them, too.

15. Hair detangler. Believe it or not, you can actually use apple cider vinegar as you would conditioner. I used apple cider vinegar in place of conditioner for a while back in 2010. It totally softened and detangled my hair. I don't use ACV conditioner as often anymore, but I do use it whenever I'm in a pinch. To make vinegar conditioner, simply mix 2 Tbsp. apple cider vinegar to a quart of water (I just kept a quart-sized Mason jar in my bathroom); pour over your hair (I usually just focused on the ends). Let your hair absorb the vinegar-water mixture for a minute or so, then rinse. I promise your hair won't smell like a pickle.


16. Dyeing Easter eggs.  Never buy egg-dyeing kits again. Making your own Easter egg dye is ridiculously simple. For the how-to, go here.

17. Cleaning the chicken coop. I decided to give the ladies' housing a good scrub-down last month following the instructions from this helpful post about naturally disinfecting chicken coops with vinegar.


18.  Baking soda + vinegar = cheap entertainment.  Kids love seeing vinegar and baking soda combine. Who am I kidding? I still think it's fun to mix the two.  My husband helped Max build a little volcano out cardboard last year. Then, he put a shot glass in the middle (the souvenir one that he got as a joke for me after a business trip to Austin. It says, "Don't Mess with Texas" ). Add some vinegar, food coloring, and baking soda and Max thought it was the coolest thing ever. We've also done the fun activity with the pan of baking soda and the colored vinegar in a dropper (if you have no idea what I'm talking about, click here). Who knew a chemical reaction could be entertaining?

Oh, vinegar. How do I love thee? Let me count the ways...

{This post is linked up to Homestead Barn Hop, Simple Lives Thursday, Your Green Resource, Farm Girl Blog Fest, Frugal Fridays, and Frugal Days, Sustainable Ways.}

Wednesday, October 31, 2012

Breathing a Little Easier with Eucalyptus Essential Oil

There's been a bit of blog silence here. I could blame it on a myriad of things. For part of the week, we were busy painting our kitchen cabinets. Then there was the planning and execution of our annual Halloween party this past week.  Or maybe it was partly because I was busy searching thrift store racks and sewing costumes, sometimes until 2 AM (hobbit and mummy costumes this year). Part of the reason for the blog silence was most certainly due to my oldest child getting strep throat, which meant lots of downtime just hanging out (read: snuggling), watching Halloween movies, and drinking smoothies. To top it off, my other boy got a nasty little cold a couple days later (how does a little nose produce so much mucus, I ask you). It's been busy, to say the least.

But now the boys are better, for the most part. My baby still has a bit of a cough and I'm still, to his chagrin, wiping his nose from time to time. One thing that helped my sweet little guy...


... eucalyptus essential oil.

Eucalyptus oil has a strong yet refreshing smell and has been used as a remedy for centuries, first by the aborigines of modern-day Australia, then to the people of China, India, and Greece.  It's powerful stuff in that little bottle! (For more a comprehensive look at eucalyptus oil, check out this helpful link.)

The way I use it to help my kids with colds is at bathtime. While I'm running the water, I just add a few drops (like five or so) to the bath. In seconds, the entire room smells like eucalyptus. It's like Vapo-Rub in bath form.

I also use it in the shower, particularly in the middle of the night. I swear kids' coughs get and sound worse at night. Last week, there was one night in particular when my little guy's coughing woke him up and he was just miserable. I took him the bathroom, put a few drops of eucalyptus oil on a washcloth, put it in the tub, and turned the shower on as hot as it would go. The room filled with the eucalyptus-infused steam and my little guy fell back asleep soon after. (Sidenote: I saw these homemade vapor shower disks on Pinterest a while back and I have yet to make them, but they seem like a great thing and I'll bet they'd work better in the shower than just the oil on a washcloth.)

The nice thing about eucalyptus oil is that it is one of the less expensive essential oils. You can use it in other ways besides the one I've mentioned -- as far as I can tell, eucalyptus oil is a great basic essential oil to keep on hand. I still have lots to learn about essential oils, but the more I learn, the more I like them. And if they help my little ones breathe easier, even better.

{Disclaimer: I think it goes without saying that I am no doctor. Not even close. I got a degree in English, people. So if you have any concerns or questions, contact a physician.}

Note: I have not received any compensation for writing this post. I have no material connection to the brands, products, or services that I have disclosed.

(This post is linked up to Your Green Resource, Simple Lives Thursday and Frugal Days, Sustainable Ways.)

Monday, June 11, 2012

Sage Advice: The Many Uses of 'Salvia Officinalis'


Back in 2005, during the first summer at our current home, my husband built a couple garden boxes for me. I was so excited to have a garden -- so many plans, so many high hopes. Anyway, I decided to plant a few herbs in one of the boxes. Nothing fancy, really, just some cilantro, chives, thyme, rosemary, and sage. Seven summers later, the chives are still growing and that small little sage transplant I bought (on a whim, mostly) at Walmart has almost completely taken over half that 4' x 4' garden box.

I've tried to dig part of the sage up and clip it back, but it is a tenacious plant. I even divided it and gave half to my mom to transplant in her yard a couple summers ago. It's bigger and stronger than ever. You'd think I would be thrilled, but I actually started to hate that plant that was taking over my garden box. I mean, I like a little sage when I cook, but there's no way I could possibly use that much sage.

So, in the chilly and muddy days of early spring, as I was making plans for my garden, I made the decision to dig up the sage completely. It was taking up precious space, after all. But then something changed my mind: the BBC show, Victorian Farm. 

Victorian Farm is this fascinating show featuring a historian and two archaeologists who lived like Victorian farmers for a year. I'm such a history geek as it is, but when you add in self-sufficiency, gardening, and homemaking to the mix, well, it's nerdy girl heaven. Anyway, in one episode, the historian, Ruth, shows how various home remedies were made during the time and she started talking about all the benefits of sage. Who knew? I certainly didn't. Since then, I've decided to keep my ever-thriving sage plant (though I'm going to divide it again and give some more to my mom since hers -- oddly enough -- struggled and died), learn more about it, and devote the entire garden box to herbs, both for cooking and medicinal purposes.

Here are a few uses for common sage (or salvia officinalis, if you want to get all scientific) -- some I've tested, some I've been meaning to test for a while, and some that I just learned about!

Cooking:  This is the only way I've really used sage, at least internally. It's a great herb for poultry dishes. At Thanksgiving, my mom always asks me to bring some of my dried sage for the stuffing and as a garnish for the Thanksgiving turkey. I also use dried sage when I'm making chicken stock. Poultry isn't the only food goes well with this herb -- check out this great link I found with lots of recipe uses for fresh sage.


Medicinal Uses:  I'm not a doctor nor am I experienced in herbal remedies, so take all of this advice at your own discretion. As of now, I'm just curious and learning all about all the ways to use herbs for common maladies. Here are a just a few medicinal uses for sage that I've read about, both in books and online:

  • Sore throats: This is what sage was being used for when it was mentioned on Victorian Farm (I wish  I could include the YouTube link, but, unfortunately, all the episodes were removed). Sage leaves contain a natural astringent and antiseptic tannins that are said to bring relief to sore throats. In the show, she made a simple tonic out of hot water, sage leaves, a little vinegar, and some honey. She let it steep for a little while, gargled with it, and spat it out. Simple enough. Around the same time, I read about making sage gargle in a book called Roots, Shoots, Buckets, and Boots (it was like the universe was sending me a sign to not kill off my sage plant or something).  The recipe is similar to the one I watched on Victorian Farm. In the book, the author suggests packing a wide-mouthed jar with dried or fresh sage leaves, then covering the leaves completely with apple cider vinegar. Adjust a lid and a ring and close tightly. Store the jar in a cool, dark place and shake the mixture daily. After a couple weeks, pour the mixture of sage and vinegar through a strainer and store the liquid in a bottle. Gargle when a sore throat strikes. I plan on giving this one a try, for sure. 
  • Dandruff:  Apparently, you can use a variety of herbs to get rid of dandruff. Check out this link for a recipe for natural dandruff shampoo using sage leaves, water, castile soap, and essential oils.
  • Womanly Issues:  From what I've read, sage has been used since ancient times for various female needs. Sage tea is said to help with symptoms associated with menopause, especially hot flashes and night sweats. It's also said to help regulate irregular menstrual cycles. However, everything I've read so far has said NOT to drink sage tea while pregnant, since it can cause uterine contractions (unless you want them to happen at the end of your pregnancy - I'll need to keep that in mind since both of my boys were born at 41 weeks. Be sure to check with your doctor or midwife first, though). Sage is also said to help dry up your milk supply when you're done with nursing. Ah, the joys of being a woman...
From everything I've read, sage should be avoided in large doses, especially if you have epilepsy. Just because something is natural that doesn't mean it doesn't have side effects. As I mentioned previously, I am certainly not a doctor (I have a degree in English, people), so do some research of your own and/or consult a pharmacist or doctor. 


Bug Repellent: I'm excited to test this use for sage next time we go camping or when we use our backyard fire-pit this summer. Mosquitoes are attracted to the carbon dioxide released from campfires and grills, so a bundle of dried sage tossed into a campfire is supposed to help keep mosquitoes away. (Sidenote: Sage is super-easy to dry. You can find my how-to here.) I also learned that besides mosquitoes, other bugs that particularly don't like sage are flies, cutworms, and ticks. 


Aesthetic Appeal:  Sage is really pretty when it flowers. That section of my garden where the sage is taking over has a pretty splash of purple in it (and bees love it -- I'm more than happy to draw bees to my garden!). I use flowering sage often when I make arrangements to display in the house (pictured above is a bouquet from my yard filled with sage flowers, yarrow, and Jupiter's beard). Sometimes I'll only use sage and put a big bunch of it in a vase. Not only does it give a room some color, but it also gives off a nice, earthy smell. By the way, if you're in my neighborhood and you want a sage bouquet, let me know (though it's getting past its prime now). Believe me, I've got plenty.

{This post is linked up to Homestead Barn Hop, Your Green Resource, and Little House Friday.}

Monday, March 5, 2012

Sudsy Savings: Two Homemade Hand Soaps

I'm going to risk sounding a little odd: I get pretty excited over homemade cleaning concoctions. Some vinegar here, some baking soda there, a few drops of essential oils, maybe even some castile soap, and I'm in a state of nerdy, frugal-girl nirvana! Homemade cleaners are a great and easy way to be thrifty. Store-bought cleaners, whether they're for your home or for your body, often contain questionable (even toxic) ingredients and so many of them are watered down. Plus, there's something just so satisfying about making them yourself. Really.


So today's post is all about homemade hand soap. I wish I would have found these two homemade solutions years ago. They're both so easy and they are big money-savers.

Solution #1
I wrote a post about how to make homemade foaming soap last August (a few months after first reading about homemade foaming soap from the blog, Live Renewed). I'm only mentioning it again because my post on it has been pretty popular on Pinterest this past week. But with good reason -- homemade foaming soap is beyond simple to make and it's so economical.


It's almost silly how easy it is to make this stuff. All you need is a foaming soap dispenser (I just reused the one we had once it was empty), liquid castile soap (I like all of Dr. Bronner's soaps -- the one pictured above is almond scented), and water.

Fill the dispenser almost all the way with water then add 1 tablespoon (you may need more or less than that) castile soap. I don't even measure anymore, though. I just fill it mostly up, eyeball the amount of soap I put in, and then I test it out. If it doesn't spread well on my hands, more soap needs to be added; if it takes a while to rinse off and it feels too slippery, I'll add more water. That's it. It literally costs just a few cents to make a bottle of foaming hand soap. To think I used to spend $3-5 for a single bottle of the Method foaming soap...yikes.

Solution #2
This next solution is something I've been wanting to share with you all for a while. Again, it made me more excited than it probably should have. But here it is: how to make your own liquid hand soap.


I saw the tutorial on how to make liquid hand soap from a bar of soap on Pinterest a few months ago and I was instantly interested. I clicked over to the blog post, looked through all the steps, and I had to give it a try. I mean, with one bar of soap, a little bit of glycerin, and some water, you can make a gallon of hand soap! A gallon!

I won't give you the in-depth step-by-step here -- the blog where I got the tutorial does a great job explaining it.  Basically, you grate up a bar of soap (I used a bar and a half of Dr. Bronner's rose-scented bar soap since the bars are smaller. Smells sooo good.), add the soap to a pot with a gallon of water in it, add a couple tablespoons of liquid glycerin (I bought my bottle of it at Walmart for like a couple bucks. It's just over by the bandages and hydrogen peroxide.), and cook it until the soap dissolves. That only takes a few minutes. Then you just leave it alone for 10-12 hours.


After the 10-12 hours, the mixture gets all thick and hard like liquid hand soap. I had to add a little extra water and give it a good stir with the hand-held electric mixer. Once the consistency is slimy and gooey (she actually said it takes on the consistency of snot. It's gross, but true.), it's ready to use.


Just like the tutorial illustrated, I put all of my liquid soap in a washed-out milk jug and labeled it. That's it. For just a few minutes of actual hands-on time, I got a gallon of quality hand soap for around five bucks!

Make these. Try to tell me you don't feel a hint of self-satisfaction when you're done. Pretty soon, you'll be feeling a little giddy over homemade concoctions, too.

Note: Some of the links in the post above are "affiliate links." This means if you click on the link and purchase the item, I will receive an affiliate commission. Regardless, I only recommend products or services I use personally and believe will add value to my readers. 

Tuesday, August 30, 2011

5 Reasons Why You Should Have an Aloe Vera Plant

I swear I put sunblock on my shoulders. I mean, I'm the one always reminding (okay, nagging) everyone in the family about sunblock. How, then, did I manage to get the most painful sunburn I've had since the blistery awfulness I experienced back in the summer of 2001?  Luckily, this most recent sunburn was only on my left shoulder. Still, it was pretty painful. So, of course, I turned to my reliable aloe vera plant.

Since I was slathering on the aloe vera goo on my shoulder for days, I couldn't help but think that I should write a post about this amazing, dare I say magical, plant. It is so beneficial and so useful. As my husband put it, it's one of those things from nature where God comes close to giving Himself away, a big hint that He exists -- a plant that awesome couldn't happen by accident. (Kevin also maintains that ripe watermelon is also one of those kinds of creations. Mmmmm...watermelon...) 


Aloe vera has been used for thousands of years, the earliest mention of it from a Sumerian tablet dating back to 2100 BC.  References to the plant have been found in the early writings of various cultures -- from India and China to Greece and the Roman Empire. It's a plant full of vitamins and minerals, making it not only useful but great for your health.

But why mention aloe vera plants on this blog? Because this ever-useful plant doesn't cost much. And since it's a living thing, your plant justs keeps on giving and giving.

Here are a few of the reasons I love having aloe vera plants around the house:

{Note: While I may be explaining some health benefits of this amazing plant, I have to just say up front that I'm no doctor (surprise!) and that all of these remedies are things I've found that work for me or that I've learned through my own research. Basically, follow all of this at your own discretion, with your own needs and history in mind.}

1.  Sunburn relief
There are a bunch of different kinds of creams, gels, and sprays on the market for sunburn relief. They work  well (Solarcaine got me through the infamous, aforementioned sunburn from my college days) and do their jobs, but I've found that using the gel from an aloe vera leaf works just as well -- in some cases, even better. You simply clip off a piece of the leaf (I usually just snap a section off with my hands), open it up, and rub the gel over the affected area. Instant relief.

From the limited research I did for this post, I learned that aloe has over 200 naturally occurring nutritional substances, along with seven of the eight essential amino acids the body needs but can't produce. In terms of skin repair, it hydrates the skin and actually accelerates the repair due the vitamins, zinc, and polysaccharides (full disclosure: I have no idea what polysaccharides are) that reduce inflammation and stimulate epidermal growth. In fact, I even read that aloe vera has been used on skin cancer patients with pretty impressive results.

One great tip for using aloe vera on sunburns: clip off a big section of the leaf and stick it in the fridge. When you're ready to use it, it's delightfully cold on your skin. Ahhhhh. Sweet relief.

2. First-aid in the kitchen
Just yesterday I burned myself making lo mein.  The second I put the onions into the hot canola oil, a few drops splattered up. Burns in the kitchen are common enough for me that I keep one of my aloe vera plants in the kitchen. So, whenever I burn myself, I just snap off the tip off a leaf, squish out the gel onto the burn, and feel better in seconds.

3.  Enhance your natural beauty
It's said that the beautiful Egyptian queen Cleopatra used aloe vera on her skin daily. Aloe vera can be used in a variety of ways in your personal hygiene and beauty regimen. It's a great skin refresher and moisturizer. You can use the gel straight from the plant onto your skin or you mix up a homemade moisturizer with it.

To make an aloe vera moisturizer, mix 1/2 tsp or so of the gel with 1 Tbsp. of extra virgin olive oil. Spread an even layer on your face in the morning and/or at night. Leftover moisturizer can be stored in a covered container in the fridge for about five days.

For more beautiful ways to use aloe vera in your personal hygiene routine, check out this helpful link that I found.

4. It's edible!
I've seen bottles and even jugs of aloe vera juice sold at the health food store and I've wondered how it's used. Turns out, taking aloe vera internally is really beneficial. It's said to help with a whole host of health issues, ranging from arthritis to gastrointestinal problems to kidney stone prevention to hair loss and dandruff to diabetes to even cancer (some believe it actually stops tumor growth). I read that Ghandi credited aloe vera juice as one of the main reasons his body could withstand long periods of fasting. I've never tried taking aloe vera as a health supplement, but I'm intrigued. You can find lots of information about the benefits of taking this herb internally here and here.

5. Purify the air in your home
A while back I came across an interesting book called How to Grow Fresh Air. Using the research found by NASA scientists (in their efforts to figure out how to keep air clean on moon bases in the future), the author compiled a list of fifty houseplants that are ideal for air purification. As you can probably guess, aloe vera is one of those plants. One of the reasons it's such a good air purifying plant is that, unlike most plants, it actually releases oxygen and absorbs carbon dioxide at night. For this reason, the author of the book recommends keeping an aloe vera plant in every bedroom (which we do).  So not only does it clean the air while we sleep, but we have plenty of aloe vera on hand whenever the need for it arises.

One other note about aloe vera: it's a really easy plant to grow. While I'm a pretty good gardener, I'm a notorious houseplant killer. I haven't killed an aloe vera plant yet. All three of our plants have survived numerous clippings and long periods of neglect (read: me forgetting to water them). To take care of your aloe vera plant, keep it in a sunny (or even semi-sunny) area, watering moderately in the spring, summer, and fall; water sparingly in the winter.

So buy an aloe vera plant of your own -- you can find them at nurseries, health food stores, and even the supermarket.  I get mine at Ikea for three bucks. With a little bit of water and hardly any work, you can reap the benefits from one of nature's amazing botanical gifts.
Related Posts with Thumbnails